#集成到现有应用
将 Lynx 作为高性能、跨平台的 UI 渲染引擎,灵活地嵌入到现有应用的任意位置。这种 既有(Brownfield) 接入方式具有最高的灵活性,支持全部平台,让你无需重写就能渐进式采用 Lynx,常用于大规模生产应用。
#将 Lynx 集成到 iOS 平台
- 本文假设你已熟悉原生 iOS 应用开发的基本概念。
- 下文中的所有代码,你都可以参考项目:integrating-lynx-demo-projects
#1. 依赖配置
使用 Cocoapods 可以方便的将 Lynx 集成到你的应用中
- Cocoapods: >= 1.11.3
- Ruby: >= 2.6.10
#配置依赖
- Lynx
Lynx Engine 核心能力,包含了解析 Bundle、样式解析、排版以及渲染视图等基础能力。
从 Cocoapods 中获取 Lynx 的最新版本。然后将 Lynx 添加到你的 Podfile 中:
source 'https://cdn.cocoapods.org/'

platform :ios, '10.0'

target 'YourTarget' do
  pod 'Lynx', '3.8.0', :subspecs => [
    'Framework',
  ]

  pod 'PrimJS', '3.8.0', :subspecs => ['quickjs', 'napi']
end- Lynx Service
Lynx Service 包括 LynxImageService、LynxLogService 等,旨在提供一些宿主应用特性强相关的能力,允许宿主应用在运行时注入自定义实现 Image Service 默认是使用 SDWebImage 图片库实现,在没有集成 SDWebImage 组件的宿主应用上则可以依赖其他图片库。
Lynx 提供了标准的原生 Image、Log、Http 服务的能力,接入方可以快速接入并使用;
从 Cocoapods 中获取 Lynx Service 的最新版本。然后将 Lynx Service 添加到你的 Podfile 中:
source 'https://cdn.cocoapods.org/'

platform :ios, '10.0'

target 'YourTarget' do
  pod 'Lynx', '3.8.0', :subspecs => [
    'Framework',
  ]

  pod 'PrimJS', '3.8.0', :subspecs => ['quickjs', 'napi']

  # integrate image-service, log-service, and http-service
  pod 'LynxService', '3.8.0', :subspecs => [
      'Image',
      'Log',
      'Http',
  ]

  # ImageService
  pod 'SDWebImage','5.15.5'
  pod 'SDWebImageWebPCoder', '0.11.0'
end- More Elements
XElement 是 Lynx 团队维护的客户端扩展元件集合,提供更丰富的元件能力,能够让 Lynx 能够更快速的被用到生产环境中,提升 Lynx 生态的活力。
从 Cocoapods 中获取 XElement 的最新版本。然后将 XElement 添加到你的 Podfile 中:
source 'https://cdn.cocoapods.org/'

platform :ios, '10.0'

target 'YourTarget' do
  pod 'Lynx', '3.8.0', :subspecs => [
    'Framework',
  ]

  pod 'PrimJS', '3.8.0', :subspecs => ['quickjs', 'napi']

  # integrate image-service, log-service, and http-service
  pod 'LynxService', '3.8.0', :subspecs => [
      'Image',
      'Log',
      'Http',
  ]

  # ImageService
  pod 'SDWebImage','5.15.5'
  pod 'SDWebImageWebPCoder', '0.11.0'

  pod 'XElement', '3.8.0'
end#安装依赖
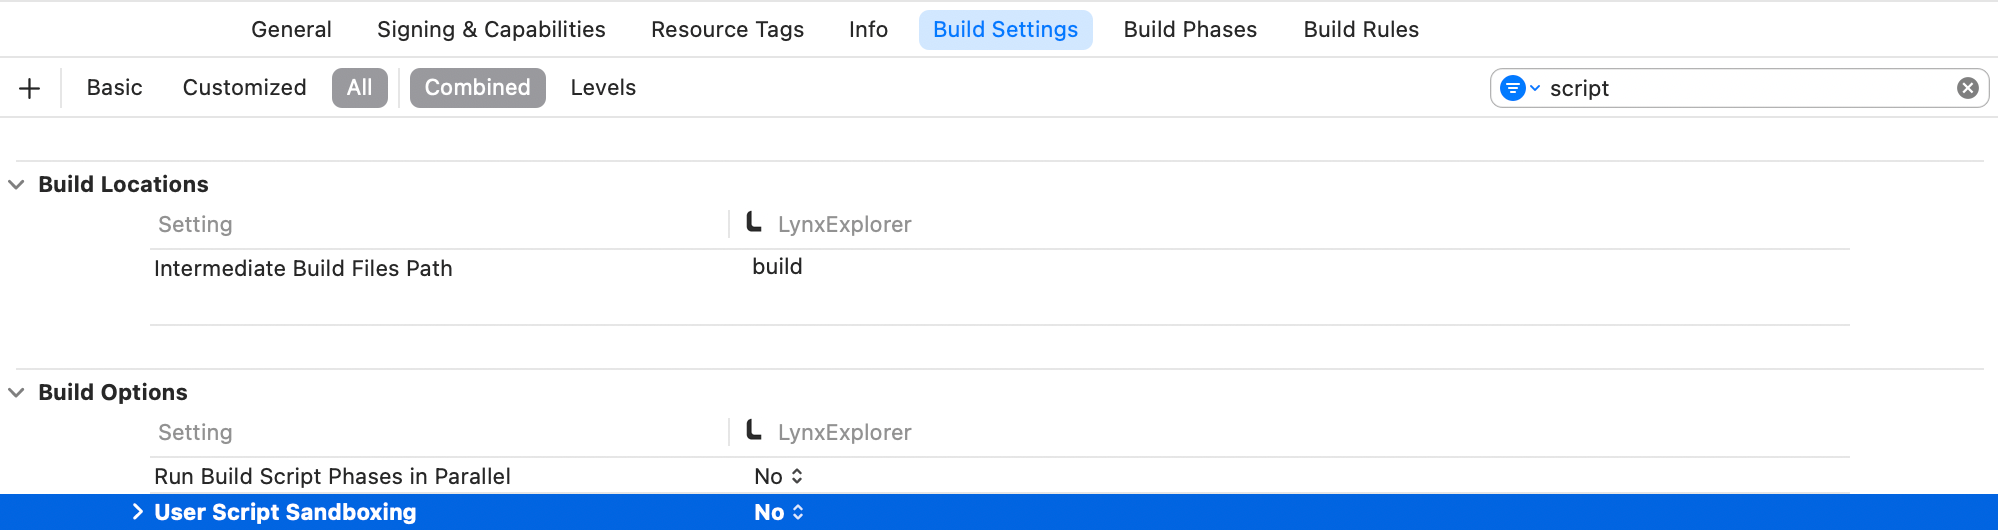
运行 pod install 安装依赖,然后打开你的 XCode 工程,同时需要确保关闭 Sandbox Scripting 能力。
为了关闭 Sandbox Scripting 能力,在 XCode 中点击应用,切换至 Build Settings。过滤 script 关键字,并且将 User Script Sandboxing 置为 NO。
#2. Lynx 环境初始化
#LynxEnv 初始化
LynxEnv 提供了 Lynx Engine 的全局初始化接口。请保证 LynxEnv 的初始化发生在 Lynx Engine 的任何接口调用之前;例如可以在 AppDelegate 中完成初始化
#import <Lynx/LynxEnv.h>
#import <Lynx/LynxView.h>

@implementation AppDelegate
- (BOOL)application:(UIApplication *)application didFinishLaunchingWithOptions:(NSDictionary *)launchOptions {
  [LynxEnv sharedInstance];
  return YES;
}import UIKit
@UIApplicationMain
class AppDelegate: UIResponder, UIApplicationDelegate {
var window: UIWindow?
func application(_ application: UIApplication, didFinishLaunchingWithOptions launchOptions: [UIApplication.LaunchOptionsKey: Any]?) -> Bool {
LynxEnv.sharedInstance()
return true
}
}
#3. 渲染 LynxView
LynxView 是 Lynx Engine 提供的渲染基本单元,LynxView 是一个继承自 iOS 原生 UIView 的实现,你可以快速的构造一个 LynxView,并将其添加到 ViewController 的视图上。
#创建 Bundle 加载器
Lynx Engine 自身并没有资源加载的能力,因此需要在初始化 LynxEnv,或者构造 LynxView 时传入 LynxTemplateProvider 协议的具体实现,Lynx 会采用注入的资源加载器来获取真实的 Bundle 内容
你可以使用多种方式获取 Bundle 的资源内容,在这里我们选择将 Bundle 的内容内置在应用中:
- 首先请将快速上手阶段生成的 Bundle 文件或者将下面的文件下载到本机上,然后按照如下步骤将文件内置:
内置文件步骤:
- 在项目的目标设置中,选择目标 Target;
- 选择 Build Phases 选项卡;
- 在 Copy Bundle Resources 部分,点击加号按钮(+)以添加文件;
- 实现 Bundle 加载器
#import <Foundation/Foundation.h>
#import <Lynx/LynxTemplateProvider.h>

NS_ASSUME_NONNULL_BEGIN

@interface DemoLynxProvider : NSObject <LynxTemplateProvider>

@end

NS_ASSUME_NONNULL_ENDLynx 是使用 Objective-C 构建的项目,如果你使用的是 Swift 工程,请使用 Bridging Header 引入所需的 Lynx 头文件。
#import <Lynx/LynxConfig.h>
#import <Lynx/LynxEnv.h>
#import <Lynx/LynxTemplateProvider.h>
#import <Lynx/LynxView.h>#import <Foundation/Foundation.h>
#import "DemoLynxProvider.h"
@implementation DemoLynxProvider
- (void)loadTemplateWithUrl:(NSString*)url onComplete:(LynxTemplateLoadBlock)callback {
NSString *filePath = [[NSBundle mainBundle] pathForResource:url ofType:@"bundle"];
if (filePath) {
NSError *error;
NSData *data = [NSData dataWithContentsOfFile:filePath options:0 error:&error];
if (error) {
NSLog(@"Error reading file: %@", error.localizedDescription);
callback(nil, error);
} else {
callback(data, nil);
}
} else {
NSError *urlError = [NSError errorWithDomain:@"com.lynx"
code:400
userInfo:@{NSLocalizedDescriptionKey : @"Invalid URL."}];
callback(nil, urlError);
}
}
@endimport Foundation
class DemoLynxProvider: NSObject, LynxTemplateProvider {
func loadTemplate(withUrl url: String!, onComplete callback: LynxTemplateLoadBlock!) {
if let filePath = Bundle.main.path(forResource: url, ofType: "bundle") {
do {
let data = try Data(contentsOf: URL(fileURLWithPath: filePath))
callback(data, nil)
} catch {
print("Error reading file: \(error.localizedDescription)")
callback(nil, error)
}
} else {
let urlError = NSError(domain: "com.lynx", code: 400, userInfo: [NSLocalizedDescriptionKey: "Invalid URL."])
callback(nil, urlError)
}
}
}#构造基础 LynxView
按照如下的方式构造一个最基础的 LynxView 实例:
#import <Lynx/LynxView.h>
#import "ViewController.h"
#import "DemoLynxProvider.h"

@implementation ViewController

- (void)viewDidLoad {
    [super viewDidLoad];
    LynxView *lynxView = [[LynxView alloc] initWithBuilderBlock:^(LynxViewBuilder *builder) {
      builder.config = [[LynxConfig alloc] initWithProvider:[[DemoLynxProvider alloc] init]];
      builder.screenSize = self.view.frame.size;
      builder.fontScale = 1.0;
    }];
    lynxView.preferredLayoutWidth = self.view.frame.size.width;
    lynxView.preferredLayoutHeight = self.view.frame.size.height;
    lynxView.layoutWidthMode = LynxViewSizeModeExact;
    lynxView.layoutHeightMode = LynxViewSizeModeExact;
}
@endimport UIKit
class ViewController: UIViewController {
override func viewDidLoad() {
super.viewDidLoad()
let lynxView = LynxView { builder in
builder.config = LynxConfig(provider: DemoLynxProvider())
builder.screenSize = self.view.frame.size
builder.fontScale = 1.0
}
lynxView.preferredLayoutWidth = self.view.frame.size.width
lynxView.preferredLayoutHeight = self.view.frame.size.height
lynxView.layoutWidthMode = .exact
lynxView.layoutHeightMode = .exact
}
}
#将 LynxView 添加到视图
然后将 LynxView 添加到应用视图中:
#import <Lynx/LynxView.h>

#import "ViewController.h"
#import "DemoLynxProvider.h"

@implementation ViewController

- (void)viewDidLoad {
  [super viewDidLoad];

  // ...

  [self.view addSubview:lynxView];
}

@endimport UIKit
class ViewController: UIViewController {
override func viewDidLoad() {
super.viewDidLoad()
// ...
self.view.addSubview(lynxView)
}
}
#渲染视图
当你完�成以上步骤之后,你就已经完成了 LynxView 初始化的全部工作,调用 lynxView.loadTemplateFromURL 方法,即可将对应的 Bundle 渲染到 LynxView 视图上,
#import <Lynx/LynxView.h>

#import "ViewController.h"
#import "DemoLynxProvider.h"

@implementation ViewController

- (void)viewDidLoad {
  [super viewDidLoad];

  // ...

  [lynxView loadTemplateFromURL:@"main.lynx" initData:nil];
}

@endimport UIKit
class ViewController: UIViewController {
override func viewDidLoad() {
super.viewDidLoad()
// ...
lynxView.loadTemplate(fromURL: "main.lynx", initData: nil)
}
}
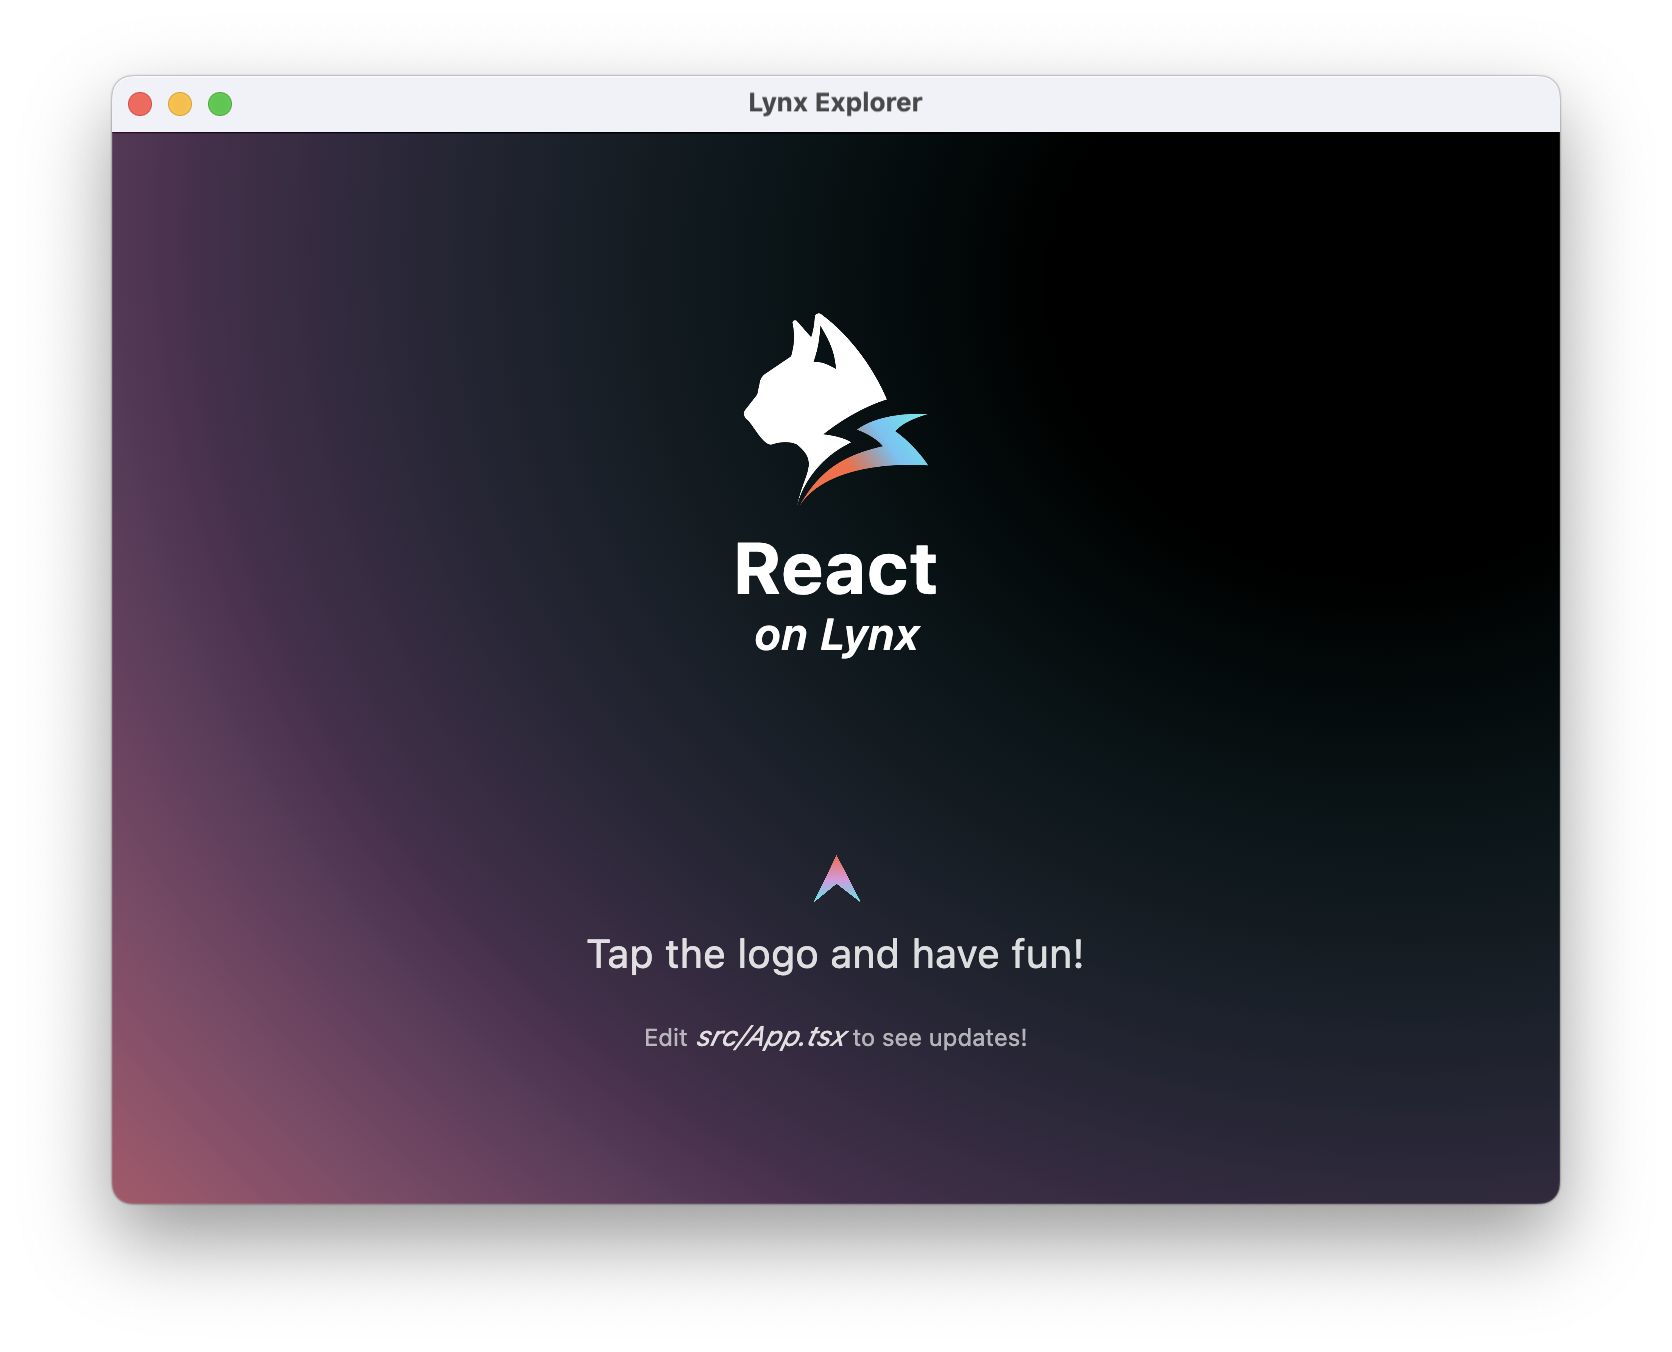
然后你将在屏幕上看到如下内容:
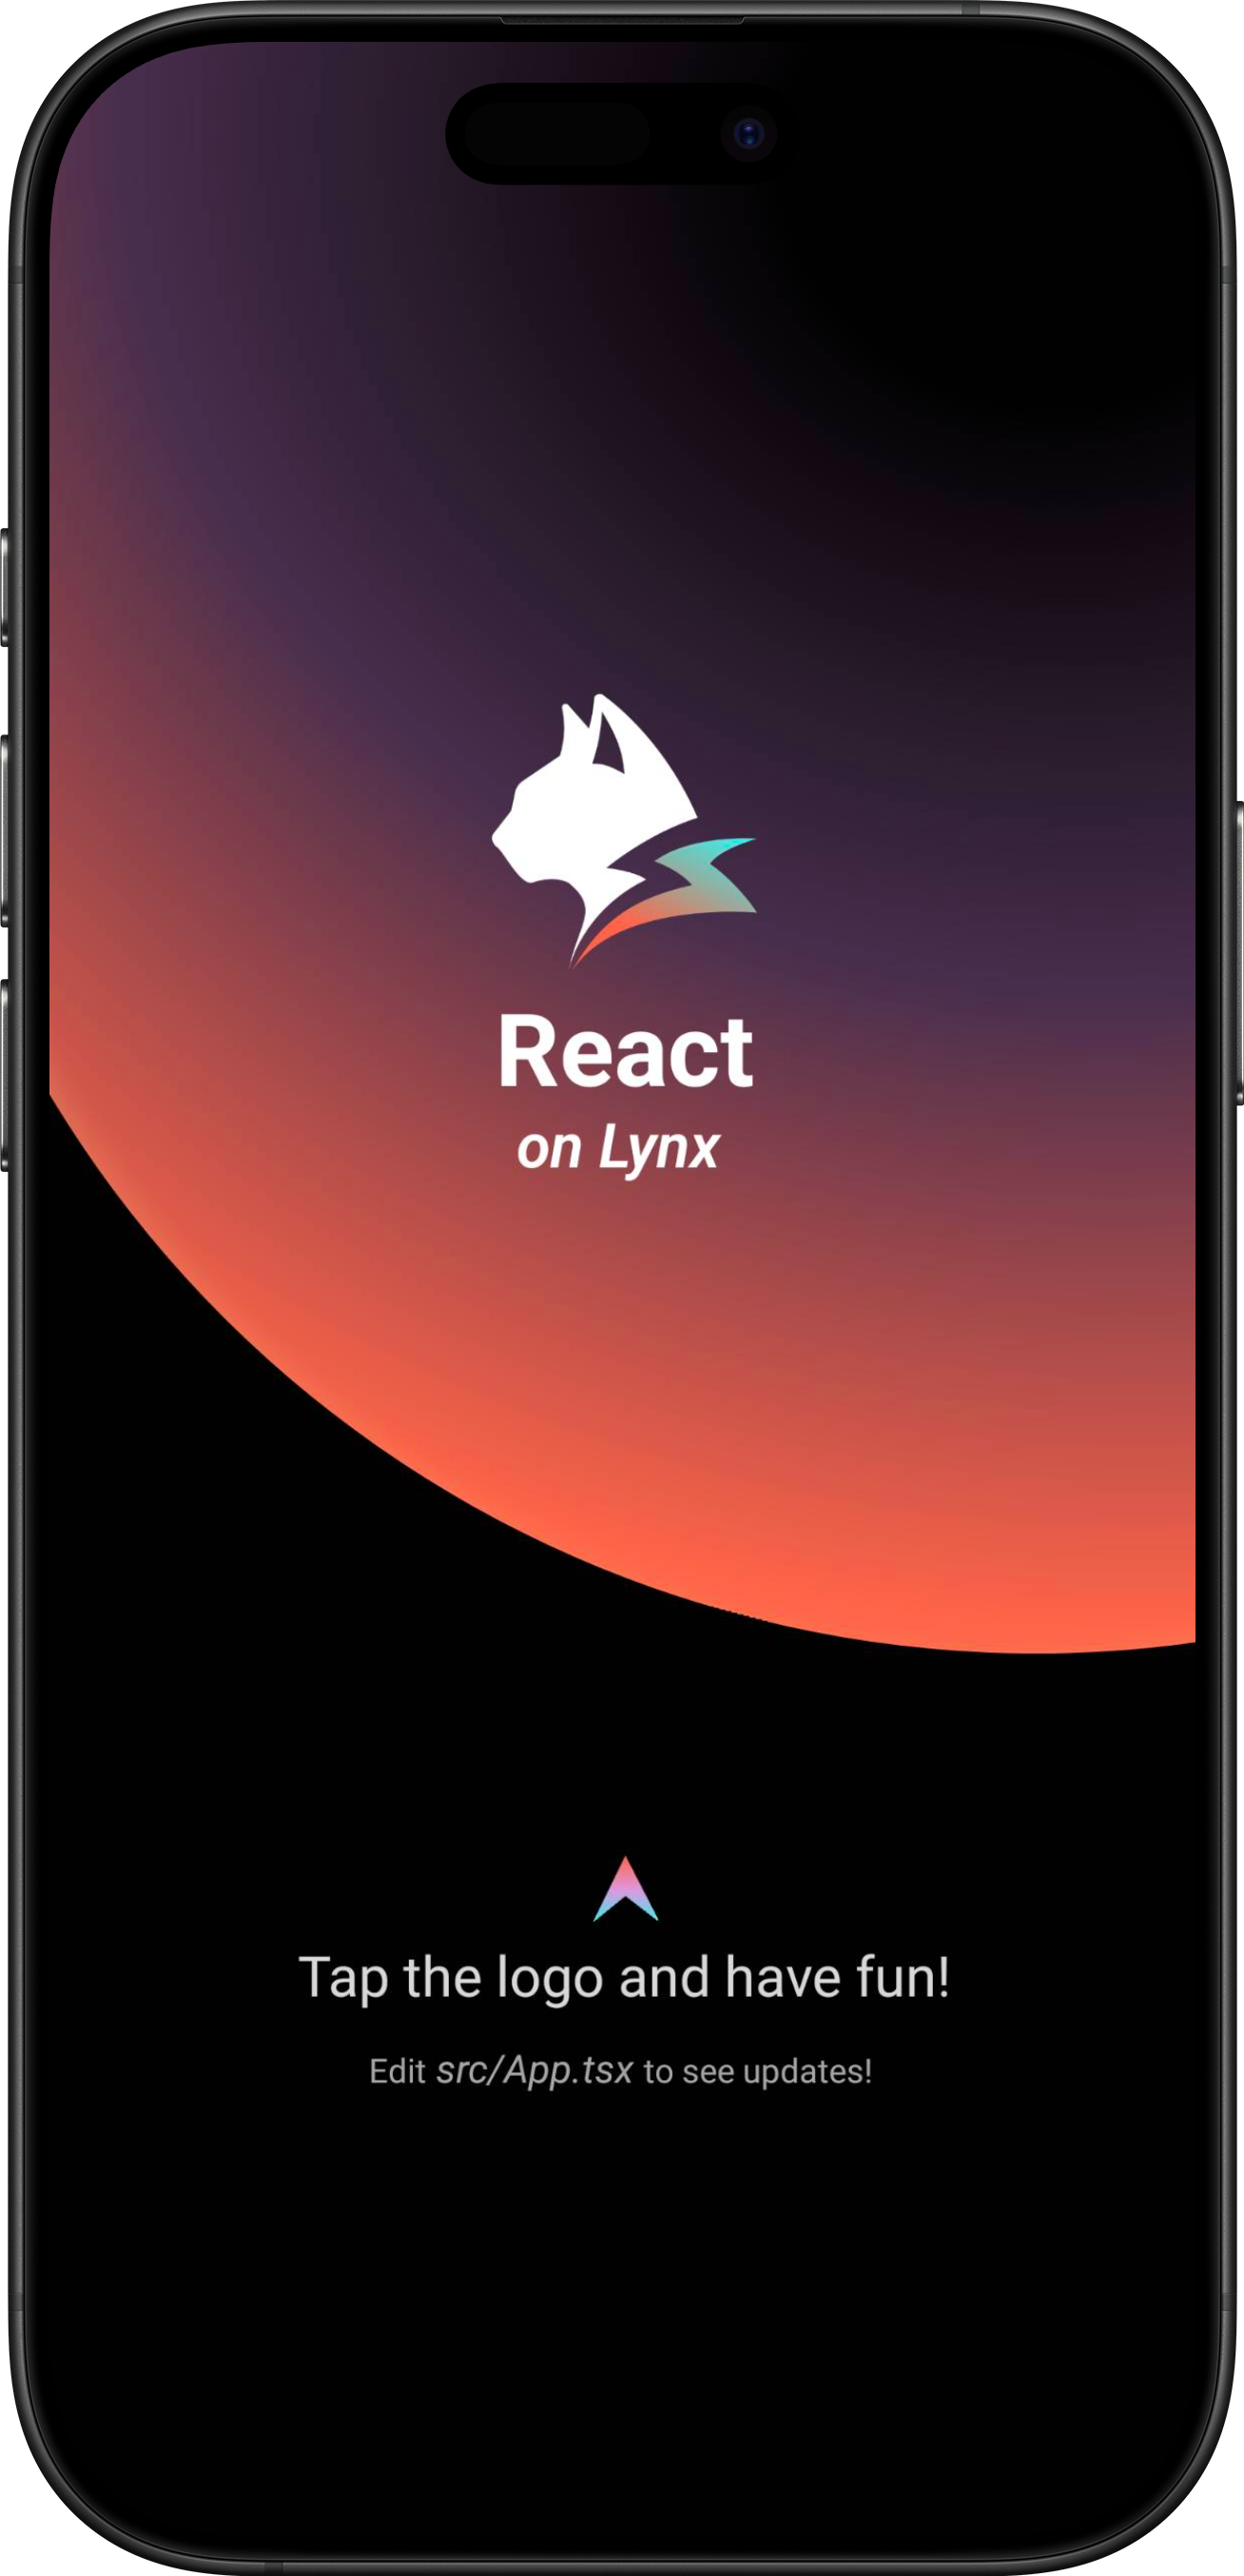
恭喜你,现在你现在已经完成了 Lynx Engine 集成的全部工作!
#4. 进入 Lynx 世界
#将 Lynx 集成到 Android 平台
- 本文假设你已熟悉原生 Android 应用开发的基本概念。
- 下文中的所有代码,你都可以参考项目: integrating-lynx-demo-projects
#1. 依赖配置
#包依赖
- Lynx
Lynx Engine 核心能力,包含了解析 Bundle、样式解析、排版以及渲染视图等基础能力,以及 Lynx 页面依赖的 JavaScript 运行时基础代码
dependencies {
    // lynx dependencies
    implementation "org.lynxsdk.lynx:lynx:3.8.0"
    implementation "org.lynxsdk.lynx:lynx-jssdk:3.8.0"
    implementation "org.lynxsdk.lynx:lynx-trace:3.8.0"
    implementation "org.lynxsdk.lynx:primjs:3.8.0"
}dependencies {
// lynx dependencies
implementation("org.lynxsdk.lynx:lynx:3.8.0")
implementation("org.lynxsdk.lynx:lynx-jssdk:3.8.0")
implementation("org.lynxsdk.lynx:lynx-trace:3.8.0")
implementation("org.lynxsdk.lynx:primjs:3.8.0")
}- Lynx Service
Lynx Service 包括 LynxImageService、LynxLogService 等,旨在提供一些宿主应用特性强相关的能力,允许宿主应用在运行时注入自定义实现,也可以使用 Lynx 提供的默认实现。
例如 LynxImageService 默认是使用 Fresco 图片库实现,在没有集成 Fresco 组件的应用上则可以依赖其他图片库,比如 Glide 来实现。Lynx 提供了标准的原生 Image、Log、Http 服务的能力,接入方可以快速接入并使用;
dependencies {
    // lynx dependencies
    implementation "org.lynxsdk.lynx:lynx:3.8.0"
    implementation "org.lynxsdk.lynx:lynx-jssdk:3.8.0"
    implementation "org.lynxsdk.lynx:lynx-trace:3.8.0"
    implementation "org.lynxsdk.lynx:primjs:3.8.0"

    // integrating image-service
    implementation "org.lynxsdk.lynx:lynx-service-image:3.8.0"

    // image-service dependencies, if not added, images cannot be loaded; if the host APP needs to use other image libraries, you can customize the image-service and remove this dependency
    implementation "com.facebook.fresco:fresco:2.3.0"
    implementation "com.facebook.fresco:animated-gif:2.3.0"
    implementation "com.facebook.fresco:animated-webp:2.3.0"
    implementation "com.facebook.fresco:webpsupport:2.3.0"
    implementation "com.facebook.fresco:animated-base:2.3.0"

    implementation "com.squareup.okhttp3:okhttp:4.9.0"

    // integrating log-service
    implementation "org.lynxsdk.lynx:lynx-service-log:3.8.0"

    // integrating http-service
    implementation "org.lynxsdk.lynx:lynx-service-http:3.8.0"
}dependencies {
// lynx dependencies
implementation("org.lynxsdk.lynx:lynx:3.8.0")
implementation("org.lynxsdk.lynx:lynx-jssdk:3.8.0")
implementation("org.lynxsdk.lynx:lynx-trace:3.8.0")
implementation("org.lynxsdk.lynx:primjs:3.8.0")
// integrating image-service
implementation("org.lynxsdk.lynx:lynx-service-image:3.8.0")
// image-service dependencies, if not added, images cannot be loaded; if the host APP needs to use other image libraries, you can customize the image-service and remove this dependency
implementation("com.facebook.fresco:fresco:2.3.0")
implementation("com.facebook.fresco:animated-gif:2.3.0")
implementation("com.facebook.fresco:animated-webp:2.3.0")
implementation("com.facebook.fresco:webpsupport:2.3.0")
implementation("com.facebook.fresco:animated-base:2.3.0")
// integrating log-service
implementation("org.lynxsdk.lynx:lynx-service-log:3.8.0")
// integrating http-service
implementation("org.lynxsdk.lynx:lynx-service-http:3.8.0")
implementation("com.squareup.okhttp3:okhttp:4.9.0")
}- More Elements
XElement 是 Lynx 团队维护的客户端扩展元件集合,提供更丰富的元件能力,能够让 Lynx 能够更快速的被用到生产环境中,提升 Lynx 生态的活力。
dependencies {
    // lynx dependencies
    implementation "org.lynxsdk.lynx:lynx:3.8.0"
    implementation "org.lynxsdk.lynx:lynx-jssdk:3.8.0"
    implementation "org.lynxsdk.lynx:lynx-trace:3.8.0"
    implementation "org.lynxsdk.lynx:primjs:3.8.0"
    // integrating image-service
    implementation "org.lynxsdk.lynx:lynx-service-image:3.8.0"
    // image-service dependencies, if not added, images cannot be loaded; if the host APP needs to use other image libraries, you can customize the image-service and remove this dependency
    implementation "com.facebook.fresco:fresco:2.3.0"
    implementation "com.facebook.fresco:animated-gif:2.3.0"
    implementation "com.facebook.fresco:animated-webp:2.3.0"
    implementation "com.facebook.fresco:webpsupport:2.3.0"
    implementation "com.facebook.fresco:animated-base:2.3.0"
    implementation "com.squareup.okhttp3:okhttp:4.9.0"
    // integrating log-service
    implementation "org.lynxsdk.lynx:lynx-service-log:3.8.0"
    // integrating http-service
    implementation "org.lynxsdk.lynx:lynx-service-http:3.8.0"
    // integrating XElement
    implementation "org.lynxsdk.lynx:xelement:3.8.0"
    implementation "org.lynxsdk.lynx:xelement-input:3.8.0"
    implementation "org.lynxsdk.lynx:xelement-overlay:3.8.0"
    implementation "org.lynxsdk.lynx:xelement-svg:3.8.0"
    implementation "org.lynxsdk.lynx:servalsvg:0.0.1-alpha.3"
    implementation "org.lynxsdk.lynx:xelement-refresh:3.8.0"
}dependencies {
// lynx dependencies
implementation("org.lynxsdk.lynx:lynx:3.8.0")
implementation("org.lynxsdk.lynx:lynx-jssdk:3.8.0")
implementation("org.lynxsdk.lynx:lynx-trace:3.8.0")
implementation("org.lynxsdk.lynx:primjs:3.8.0")
// integrating image-service
implementation("org.lynxsdk.lynx:lynx-service-image:3.8.0")
// image-service dependencies, if not added, images cannot be loaded; if the host APP needs to use other image libraries, you can customize the image-service and remove this dependency
implementation("com.facebook.fresco:fresco:2.3.0")
implementation("com.facebook.fresco:animated-gif:2.3.0")
implementation("com.facebook.fresco:animated-webp:2.3.0")
implementation("com.facebook.fresco:webpsupport:2.3.0")
implementation("com.facebook.fresco:animated-base:2.3.0")
// integrating log-service
implementation("org.lynxsdk.lynx:lynx-service-log:3.8.0")
// integrating http-service
implementation("org.lynxsdk.lynx:lynx-service-http:3.8.0")
implementation("com.squareup.okhttp3:okhttp:4.9.0")
// integrating XElement
implementation("org.lynxsdk.lynx:xelement:3.8.0")
implementation("org.lynxsdk.lynx:xelement-input:3.8.0")
implementation("org.lynxsdk.lynx:xelement-overlay:3.8.0")
implementation("org.lynxsdk.lynx:xelement-svg:3.8.0")
implementation("org.lynxsdk.lynx:servalsvg:0.0.1-alpha.3")
implementation("org.lynxsdk.lynx:xelement-refresh:3.8.0")
}#配置混淆规则 (Proguard)
Lynx Engine 混淆规则如下,建议参考最新的源码配置:
# LYNX START
# use @Keep to annotate retained classes.
-dontwarn android.support.annotation.Keep
-keep @android.support.annotation.Keep class **
-keep @android.support.annotation.Keep class ** {
    @android.support.annotation.Keep <fields>;
    @android.support.annotation.Keep <methods>;
}
-dontwarn androidx.annotation.Keep
-keep @androidx.annotation.Keep class **
-keep @androidx.annotation.Keep class ** {
    @androidx.annotation.Keep <fields>;
    @androidx.annotation.Keep <methods>;
}
# native method call
-keepclasseswithmembers,includedescriptorclasses class * {
    native <methods>;
}
-keepclasseswithmembers class * {
    @com.lynx.tasm.base.CalledByNative <methods>;
}

# to customize a module, you need to keep the class name and the method annotated as LynxMethod.
-keepclasseswithmembers class * {
    @com.lynx.jsbridge.LynxMethod <methods>;
}

-keepclassmembers class *  {
    @com.lynx.tasm.behavior.LynxProp <methods>;
    @com.lynx.tasm.behavior.LynxPropGroup <methods>;
    @com.lynx.tasm.behavior.LynxUIMethod <methods>;
}

-keepclassmembers class com.lynx.tasm.behavior.ui.UIGroup {
    public boolean needCustomLayout();
}

# in case R8 compiler may remove mLoader in bytecode.
# as mLoader is not used in java and passed as a WeakRef in JNI.
-keepclassmembers class com.lynx.tasm.LynxTemplateRender {
    private com.lynx.tasm.core.resource.LynxResourceLoader mLoader;
    private com.lynx.tasm.core.resource.LynxResourceLoader mResourceLoader;
}

# the automatically generated setter classes use the class names of LynxBaseUI and ShadowNode and their subclasses.
-keep class com.lynx.tasm.behavior.ui.LynxBaseUI
-keep class com.lynx.tasm.behavior.shadow.ShadowNode
-keep class com.lynx.jsbridge.LynxModule { *; }
-keep class * extends com.lynx.tasm.behavior.ui.LynxBaseUI
-keep class * extends com.lynx.tasm.behavior.shadow.ShadowNode
-keep class * extends com.lynx.jsbridge.LynxModule { *; }
-keep class * extends com.lynx.jsbridge.LynxContextModule
-keep class * implements com.lynx.tasm.behavior.utils.Settable
-keep class * implements com.lynx.tasm.behavior.utils.LynxUISetter
-keep class * implements com.lynx.tasm.behavior.utils.LynxUIMethodInvoker
-keep class com.lynx.tasm.rendernode.compat.**{
    *;
}
-keep class com.lynx.tasm.rendernode.compat.RenderNodeFactory{
    *;
}
# LYNX END#2. 环境初始化
#LynxService 初始化
- Lynx Service 提供了宿主特性相关能力,推荐在应用的
Application#onCreate生命周期中完成 Lynx Service 的初始化; - Lynx Service 需主动注入;
Lynx 需要在应用启动时进行一些全局的初始化操作,请在 AndroidManifest.xml 文件中指定你自定义的 Application 类。
<application
  android:name=".YourApplication">
</application>import android.app.Application;
import com.facebook.drawee.backends.pipeline.Fresco;
import com.facebook.imagepipeline.core.ImagePipelineConfig;
import com.facebook.imagepipeline.memory.PoolConfig;
import com.facebook.imagepipeline.memory.PoolFactory;
import com.lynx.service.http.LynxHttpService;
import com.lynx.service.image.LynxImageService;
import com.lynx.service.log.LynxLogService;
import com.lynx.tasm.service.LynxServiceCenter;
public class YourApplication extends Application {
@Override
public void onCreate() {
super.onCreate();
initLynxService();
}
private void initLynxService() {
// init Fresco which is needed by LynxImageService
final PoolFactory factory = new PoolFactory(PoolConfig.newBuilder().build());
ImagePipelineConfig.Builder builder =
ImagePipelineConfig.newBuilder(getApplicationContext()).setPoolFactory(factory);
Fresco.initialize(getApplicationContext(), builder.build());
LynxServiceCenter.inst().registerService(LynxImageService.getInstance());
LynxServiceCenter.inst().registerService(LynxLogService.INSTANCE);
LynxServiceCenter.inst().registerService(LynxHttpService.INSTANCE);
}
}import android.app.Application
import com.facebook.drawee.backends.pipeline.Fresco
import com.facebook.imagepipeline.core.ImagePipelineConfig
import com.facebook.imagepipeline.memory.PoolConfig
import com.facebook.imagepipeline.memory.PoolFactory
import com.lynx.service.http.LynxHttpService
import com.lynx.service.image.LynxImageService
import com.lynx.service.log.LynxLogService
import com.lynx.tasm.service.LynxServiceCenter
class YourApplication : Application() {
override fun onCreate() {
super.onCreate()
initLynxService()
}
private fun initLynxService() {
// init Fresco which is needed by LynxImageService
val factory = PoolFactory(PoolConfig.newBuilder().build())
val builder = ImagePipelineConfig.newBuilder(applicationContext).setPoolFactory(factory)
Fresco.initialize(applicationContext, builder.build())
LynxServiceCenter.inst().registerService(LynxImageService.getInstance())
LynxServiceCenter.inst().registerService(LynxLogService)
LynxServiceCenter.inst().registerService(LynxHttpService)
}
}#LynxEnv 初始化
LynxEnv 提供了 Lynx Engine 的全局初始化接口, 请保证 LynxEnv 的初始化发生在 Lynx Engine 的任何接口调用之前; 推荐在应用的 Application#onCreate 生命周期中完成 LynxEnv 的初始化;
import com.lynx.tasm.LynxEnv;

public class YourApplication extends Application {

    @Override
    public void onCreate() {
        super.onCreate();
        initLynxService();
        initLynxEnv();
    }

    private void initLynxEnv() {
        LynxEnv.inst().init(
            this,
            null,
            null,
            null
        );
    }
}import com.lynx.tasm.LynxEnv
class YourApplication : Application() {
override fun onCreate() {
super.onCreate()
initLynxService()
initLynxEnv()
}
private fun initLynxEnv() {
LynxEnv.inst().init(
this,
null,
null,
null
)
}
}LynxEnv 初始化方法参数说明如下:
- appContext: 应用生命周期上下文对象,即 ApplicationContext;
- libraryLoader: 本地 so 文件加载器,默认可传 null,即使用系统默认加载器;
- templateProvider: 全局的 AppBundle 加载器,默认可传 null;
- behaviorBundle: 自定义组件列表,默认可传 null,如有定制化需求可参考自定义组件;
#3. 渲染 LynxView
#创建 Bundle 加载器
Lynx Engine 自身并没有集成下载资源的能力,因此需要宿主应用来提供 AbsTemplateProvider 的具体实现,并在构造 LynxView 时注入,Lynx 会采用注入的资源加载器来获取真实的 Bundle 内容。
你可以使用多种方式获取 Bundle 的资源内容,在这里我们选择将 Bundle 的内容内置在应用中:
- 首先请将快速上手阶段生成的 Bundle 文件放置在 src/main/assets 目录下,或者你可以将下面的文件下载到本机上并放置在同样目录下:
app
└── src
    └── main
        ├── java
        ├── res
        └── assets
└── main.lynx.bundle- 实现 Bundle 加载器
import android.content.Context;
import com.lynx.tasm.provider.AbsTemplateProvider;
import java.io.ByteArrayOutputStream;
import java.io.IOException;
import java.io.InputStream;

public class DemoTemplateProvider extends AbsTemplateProvider {
    private Context mContext;

    DemoTemplateProvider(Context context) {
        this.mContext = context.getApplicationContext();
    }

    @Override
    public void loadTemplate(String uri, Callback callback) {
        new Thread(new Runnable() {
            @Override
            public void run() {
                try (InputStream inputStream = mContext.getAssets().open(uri);
                     ByteArrayOutputStream byteArrayOutputStream = new ByteArrayOutputStream()) {
                    byte[] buffer = new byte[1024];
                    int length;
                    while ((length = inputStream.read(buffer)) != -1) {
                        byteArrayOutputStream.write(buffer, 0, length);
                    }
                    callback.onSuccess(byteArrayOutputStream.toByteArray());
                } catch (IOException e) {
                    callback.onFailed(e.getMessage());
                }
            }
        }).start();
    }
}import android.content.Context
import com.lynx.tasm.provider.AbsTemplateProvider
import java.io.ByteArrayOutputStream
import java.io.IOException
class DemoTemplateProvider(context: Context) : AbsTemplateProvider() {
private var mContext: Context = context.applicationContext
override fun loadTemplate(uri: String, callback: Callback) {
Thread {
try {
mContext.assets.open(uri).use { inputStream ->
ByteArrayOutputStream().use { byteArrayOutputStream ->
val buffer = ByteArray(1024)
var length: Int
while ((inputStream.read(buffer).also { length = it }) != -1) {
byteArrayOutputStream.write(buffer, 0, length)
}
callback.onSuccess(byteArrayOutputStream.toByteArray())
}
}
} catch (e: IOException) {
callback.onFailed(e.message)
}
}.start()
}
}#构造 LynxView
LynxView 是 Lynx Engine 提供的渲染基本单元,LynxView 是继承自 Android 原生 View,你可以快速的构造一个 LynxView,并将其任意添加到原生 Android 视图树上。
import android.app.Activity;
import android.os.Bundle;

import com.lynx.tasm.LynxView;
import com.lynx.tasm.LynxViewBuilder;

public class MainActivity extends Activity {

    @Override
    protected void onCreate(Bundle savedInstanceState) {
        super.onCreate(savedInstanceState);
        LynxView lynxView = buildLynxView();
        setContentView(lynxView);
    }

    private LynxView buildLynxView() {
        LynxViewBuilder viewBuilder = new LynxViewBuilder();
        viewBuilder.setTemplateProvider(new DemoTemplateProvider(this));
        return viewBuilder.build(this);
    }
}import android.app.Activity
import android.os.Bundle
import com.lynx.tasm.LynxView
import com.lynx.tasm.LynxViewBuilder
class MainActivity : Activity() {
override fun onCreate(savedInstanceState: Bundle?) {
super.onCreate(savedInstanceState)
val lynxView = buildLynxView()
setContentView(lynxView)
}
private fun buildLynxView(): LynxView {
val viewBuilder: LynxViewBuilder = LynxViewBuilder()
viewBuilder.setTemplateProvider(DemoTemplateProvider(this))
return viewBuilder.build(this)
}
}#引入 XElement
XElement 需要额外在LynxViewBuilder 中被引入:
import android.app.Activity;
import android.os.Bundle;

import com.lynx.tasm.LynxView;
import com.lynx.tasm.LynxViewBuilder;
import com.lynx.xelement.XElementBehaviors;

public class MainActivity extends Activity {

    @Override
    protected void onCreate(Bundle savedInstanceState) {
        super.onCreate(savedInstanceState);
        LynxView lynxView = buildLynxView();
        setContentView(lynxView);
    }

    private LynxView buildLynxView() {
        LynxViewBuilder viewBuilder = new LynxViewBuilder();
        viewBuilder.addBehaviors(new XElementBehaviors().create());
        viewBuilder.setTemplateProvider(new DemoTemplateProvider(this));
        return viewBuilder.build(this);
    }
}import android.app.Activity
import android.os.Bundle
import com.lynx.tasm.LynxView
import com.lynx.tasm.LynxViewBuilder
import com.lynx.xelement.XElementBehaviors
class MainActivity : Activity() {
override fun onCreate(savedInstanceState: Bundle?) {
super.onCreate(savedInstanceState)
val lynxView = buildLynxView()
setContentView(lynxView)
}
private fun buildLynxView(): LynxView {
val viewBuilder: LynxViewBuilder = LynxViewBuilder()
viewBuilder.addBehaviors(XElementBehaviors().create())
viewBuilder.setTemplateProvider(DemoTemplateProvider(this))
return viewBuilder.build(this)
}
}#渲染视图
当你完成以上步骤之后,已经完成了 LynxView 创建与资源读取的全部工作,调用 lynxView.renderTemplateUrl 方法,即可将对应的 Bundle 内容渲染到 LynxView 视图上。
public class MainActivity extends Activity {

    @Override
    protected void onCreate(Bundle savedInstanceState) {
        super.onCreate(savedInstanceState);
        LynxView lynxView = buildLynxView();
        setContentView(lynxView);

        String url = "main.lynx.bundle";
        lynxView.renderTemplateUrl(url, "");
    }
}class MainActivity : Activity() {
override fun onCreate(savedInstanceState: Bundle?) {
super.onCreate(savedInstanceState)
val lynxView = buildLynxView()
setContentView(lynxView)
val uri = "main.lynx.bundle";
lynxView.renderTemplateUrl(uri, "")
}
}然后你将在屏幕上看到如下内容:
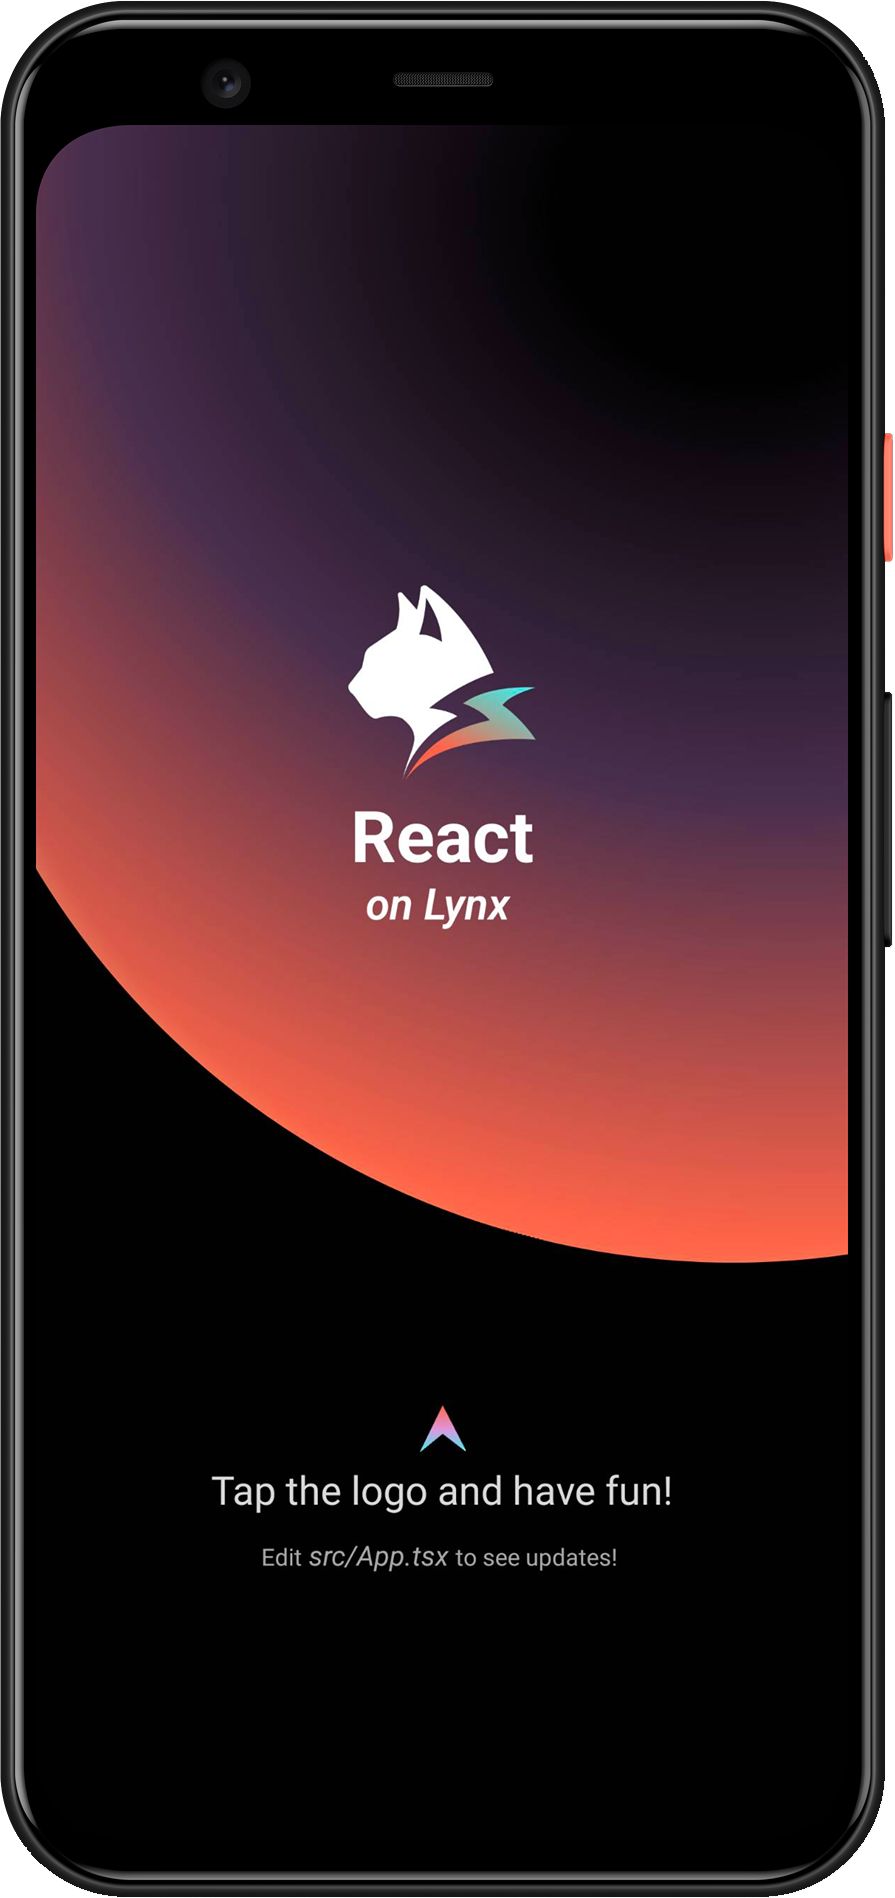
恭喜你,现在你现在已经完成了 Lynx Engine 集成的全部工作!
#4. 进入 Lynx 世界
#将 Lynx 集成到 Harmony 平台
- 本文假设你已熟悉原生 Harmony 应用开发的基本概念。
- 下文中的所有代码,你都可以参考项目:integrating-lynx-demo-projects。
#1. 依赖配置
#包依赖
- Lynx
Lynx Engine 核心能力,包含了解析 Bundle、样式解析、排版以及渲染视图等基础能力,以及 Lynx 页面依赖的 JavaScript 运行时基础代码。
"dependencies": {
  "@ohos/imageknife": "3.2.6",
  "@lynx/lynx": "3.6.0",
  "@lynx/primjs": "3.6.1",
},- Lynx Service
Lynx Service 包括 LynxDevtoolService、LynxLogService 等,旨在提供一些宿主应用特性强相关的能力,允许宿主应用在运行时注入自定义实现,也可以使用 Lynx 提供的默认实现。例如 LynxHttpService 默认是使用鸿蒙内置的 http 模块实现。Lynx 提供了标准的原生 Log、Http 服务的能力,接入方可以快速接入并使用;
"dependencies": {
  "@ohos/imageknife": "3.2.6",
  "@lynx/lynx": "3.6.0",
  "@lynx/lynx_devtool": "3.6.0",
  "@lynx/lynx_devtool_service": "3.6.0",
  "@lynx/lynx_http_service": "3.6.0",
  "@lynx/lynx_log_service": "3.6.0",
  "@lynx/primjs": "3.6.1",
},#能力依赖
- Native C++ 配置
为了引入 libc++_shared.so 需要进行 Native C++ 相关配置,需要定义 CMakeLists.txt。
# the minimum version of CMake.
cmake_minimum_required(VERSION 3.5.0)
project(MyApplication)
并且修改 entry/build-profile.json5 中的 buildOptions
{
  buildOption: {
    externalNativeOptions: {
      path: './src/main/cpp/CMakeLists.txt',
      arguments: '',
      cppFlags: '',
    },
  },
}- 网络请求配置
如果需要请求网络资源,请在 module.json5 配置 requestPermissions 来启用网络请求。
{
  module: {
    requestPermissions: [
      {
        name: 'ohos.permission.INTERNET',
        reason: '$string:network',
        usedScene: {
          abilities: ['FormAbility'],
          when: 'inuse',
        },
      },
    ],
  },
}
并且在 entry/src/main/resources/base/element/string.json 中配置 network 关键字段。
{
  "string": [
    {
      "name": "network",
      "value": "Request network"
    }
  ]
}- XElement 依赖配置
"dependencies": {
  "@lynx/xelement_svg": "3.6.0",
},#2. 环境初始化
#LynxService 初始化
- Lynx Service 提供了宿主特性相关能力,推荐在应用的
UIAbility#onCreate生命周期中完成 Lynx Service 的初始化; - Lynx Service 需主动注入;
import { LLog, LynxServiceCenter, LynxEnv, LynxServiceType } from '@lynx/lynx';
import { LynxDevToolService } from '@lynx/lynx_devtool_service';
import { LynxLogService } from '@lynx/lynx_log_service';
import { LynxHttpService } from '@lynx/lynx_http_service';

export default class EntryAbility extends UIAbility {
  onCreate(want: Want, launchParam: AbilityConstant.LaunchParam): void {
    // Init LynxDevtoolService
    LynxServiceCenter.registerService(
      LynxServiceType.DevTool,
      LynxDevToolService.instance,
    );
    // Init LynxHttpService
    LynxServiceCenter.registerService(
      LynxServiceType.Http,
      LynxHttpService.instance,
    );
    // Init LynxLogService

    LynxServiceCenter.registerService(
      LynxServiceType.Log,
      LynxLogService.instance,
    );
  }
}#LynxEnv 初始化
LynxEnv 提供了 Lynx Engine 的全局初始化接口。请保证 LynxEnv 的初始化发生在 Lynx Engine 的任何接口调用之前;例如可以在 EntryAbility#onCreate 生命周期中完成 LynxEnv 的初始化。
import { LLog, LynxEnv } from '@lynx/lynx';

export default class EntryAbility extends UIAbility {
  onCreate(want: Want, launchParam: AbilityConstant.LaunchParam): void {
    // Init LynxService
    // ...
    // Init LynxEnv
    LLog.useSysLog(true);
    LynxEnv.initialize(this.context);
    let options = new Map<string, string>();
    options.set('App', 'LynxExplorer');
    options.set('AppVersion', '0.0.1');
    LynxEnv.setAppInfo(options);
    LynxEnv.enableDevtool(true);
  }
}#3.渲染 LynxView
#创建 Bundle 加载器
Lynx Engine 自身并没有集成下载资源的能力,因此需要宿主应用来提供 LynxResourceProvider 的具体实现,并在构造 LynxView 时注入,Lynx 会采用注入的资源加载器来获取真实的 Bundle 内容。
你可以使用多种方式获取 Bundle 的资源内容,在这里我们选择将 Bundle 的内容内置在应用中:
首先请将快速上手阶段生成的 Bundle 文件放置在 src/main/resources/rawfile 目录下;或者你可以将下面的文件下载到本机上并放置在同样目录下;
entry
└── src
    └── main
        └── resources
            └── rawfile
└── main.lynx.bundle- LynxTemplateResourceFetcher
LynxTemplateResourceFetcher 提供了 Bundle 模板资源的加载能力,你需要实现 fetchTemplate 方法来完成 Bundle 模板资源的加载。
import {
  LLog,
  LynxResourceRequest,
  LynxTemplateResourceFetcher,
  TemplateProviderResult,
} from '@lynx/lynx';
import { AsyncCallback, BusinessError } from '@ohos.base';
import http from '@ohos.net.http';
import resourceManager from '@ohos.resourceManager';

export class ExampleTemplateResourceFetcher extends LynxTemplateResourceFetcher {
  fetchTemplate(
    request: LynxResourceRequest,
    callback: AsyncCallback<TemplateProviderResult, void>,
  ) {
    if (request.url.startsWith('http')) {
      let httpRequest = http.createHttp();
      httpRequest.request(
        request.url,
        {
          expectDataType: http.HttpDataType.ARRAY_BUFFER,
        },
        (err: BusinessError, data: http.HttpResponse) => {
          callback(err, {
            binary: data?.result as ArrayBuffer,
          });
          httpRequest.destroy();
        },
      );
    } else {
      // local file
      const context: Context = getContext(this);
      const resourceMgr: resourceManager.ResourceManager =
        context.resourceManager;
      resourceMgr.getRawFileContent(
        request.url,
        (err: BusinessError, data: Uint8Array) => {
          callback(err, {
            binary: data?.buffer as ArrayBuffer,
          });
        },
      );
    }
  }

  fetchSSRData(
    request: LynxResourceRequest,
    callback: AsyncCallback<ArrayBuffer, void>,
  ) {
    let httpRequest = http.createHttp();
    httpRequest.request(
      request.url,
      {
        expectDataType: http.HttpDataType.ARRAY_BUFFER,
      },
      (err: BusinessError, data: http.HttpResponse) => {
        callback(err, data?.result as ArrayBuffer);
        httpRequest.destroy();
      },
    );
  }
}- LynxMediaResourceFetcher
LynxMediaResourceFetcher 提供了媒体资源的加载能力。
import {
  LynxMediaResourceFetcher,
  LynxResourceRequest,
  LynxOptionalBool,
} from '@lynx/lynx';

export class ExampleMediaResourceFetcher extends LynxMediaResourceFetcher {
  shouldRedirectUrl(request: LynxResourceRequest): string {
    // just return the input url;
    return request.url;
  }

  isLocalResource(url: string): LynxOptionalBool {
    return LynxOptionalBool.UNDEFINED;
  }
}- LynxGenericResourceFetcher
LynxGenericResourceFetcher 提供了通用资源的加载能力,你需要实现 fetchResource 方法来完成通用资源的加载。
import {
  LynxError,
  LynxSubErrorCode,
  LynxGenericResourceFetcher,
  LynxResourceRequest,
  LynxResourceType,
  LynxStreamDelegate,
} from '@lynx/lynx';
import { AsyncCallback, BusinessError } from '@ohos.base';
import http from '@ohos.net.http';
import { ImageKnife, ImageKnifeOption, CacheStrategy } from '@ohos/imageknife';

export class ExampleGenericResourceFetcher extends LynxGenericResourceFetcher {
  fetchResource(
    request: LynxResourceRequest,
    callback: AsyncCallback<ArrayBuffer, void>,
  ): void {
    let httpRequest = http.createHttp();
    httpRequest.request(
      request.url,
      {
        expectDataType: http.HttpDataType.ARRAY_BUFFER,
      },
      (err: BusinessError, data: http.HttpResponse) => {
        callback(err, data?.result as ArrayBuffer);
        httpRequest.destroy();
      },
    );
  }

  fetchResourcePath(
    request: LynxResourceRequest,
    callback: AsyncCallback<string, void>,
  ): void {
    if (request.type === LynxResourceType.LYNX_RESOURCE_TYPE_IMAGE) {
      let option = new ImageKnifeOption();
      option.loadSrc = request.url;
      option.writeCacheStrategy = CacheStrategy.File;
      let error: BusinessError | undefined = undefined;
      ImageKnife.getInstance()
        .preLoadCache(option)
        .then((data: string) => {
          if (data.length > 0) {
            callback(error, data);
          } else {
            error = {
              code: LynxSubErrorCode.E_RESOURCE_IMAGE_PIC_SOURCE,
              message: 'Image path is invalid',
              name: 'Image Error',
            };
            callback(error, '');
          }
        })
        .catch((e: string) => {
          error = {
            code: LynxSubErrorCode.E_RESOURCE_IMAGE_FROM_NETWORK_OR_OTHERS,
            message: e,
            name: 'Image Error',
          };
          callback(error, '');
        });
    } else {
      callback(
        {
          code: LynxError.LYNX_ERROR_CODE_RESOURCE,
          message: 'unsupported type: ' + request.type,
          name: 'Resource Error',
        },
        '',
      );
    }
  }

  fetchStream(
    request: LynxResourceRequest,
    delegate: LynxStreamDelegate,
  ): void {
    // TODO(Lynx): support fetching stream.
    delegate.onStart(100);
    let a = new ArrayBuffer(10);
    delegate.onData(a, 0, 10);
    delegate.onEnd();
  }

  cancel(request: LynxResourceRequest): void {
    // TODO(Lynx)
  }
}#构造 LynxView 并渲染视图
当你完成以上步骤之后,已经完成了 LynxView 创建与资源读取的全部工作,即可将对应的 Bundle 内容渲染到 LynxView 视图上。
import {
  LynxTemplateResourceFetcher,
  LynxMediaResourceFetcher,
  LynxGenericResourceFetcher,
  LynxView,
} from '@lynx/lynx';

import { ExampleTemplateResourceFetcher } from '../provider/ExampleTemplateResourceFetcher';
import { ExampleMediaResourceFetcher } from '../provider/ExampleMediaResourceFetcher';
import { ExampleGenericResourceFetcher } from  '../provider/ExampleGenericResourceFetcher';

@Entry
@Component
struct Index {
  templateResourceFetcher: LynxTemplateResourceFetcher = new ExampleTemplateResourceFetcher();
  mediaResourceFetcher: LynxMediaResourceFetcher = new ExampleMediaResourceFetcher();
  genericResourceFetcher: LynxGenericResourceFetcher = new ExampleGenericResourceFetcher();
  private url: string = 'your bundle file';

  build() {
    Column() {
      LynxView({
        templateResourceFetcher: this.templateResourceFetcher,
        mediaResourceFetcher: this.mediaResourceFetcher,
        genericResourceFetcher: this.genericResourceFetcher,
        url: this.url,
      }).width('100%').height('100%');
    }
    .size({ width: '100%', height: '100%' })
  }
}
然后你将在屏幕上看到如下内容:
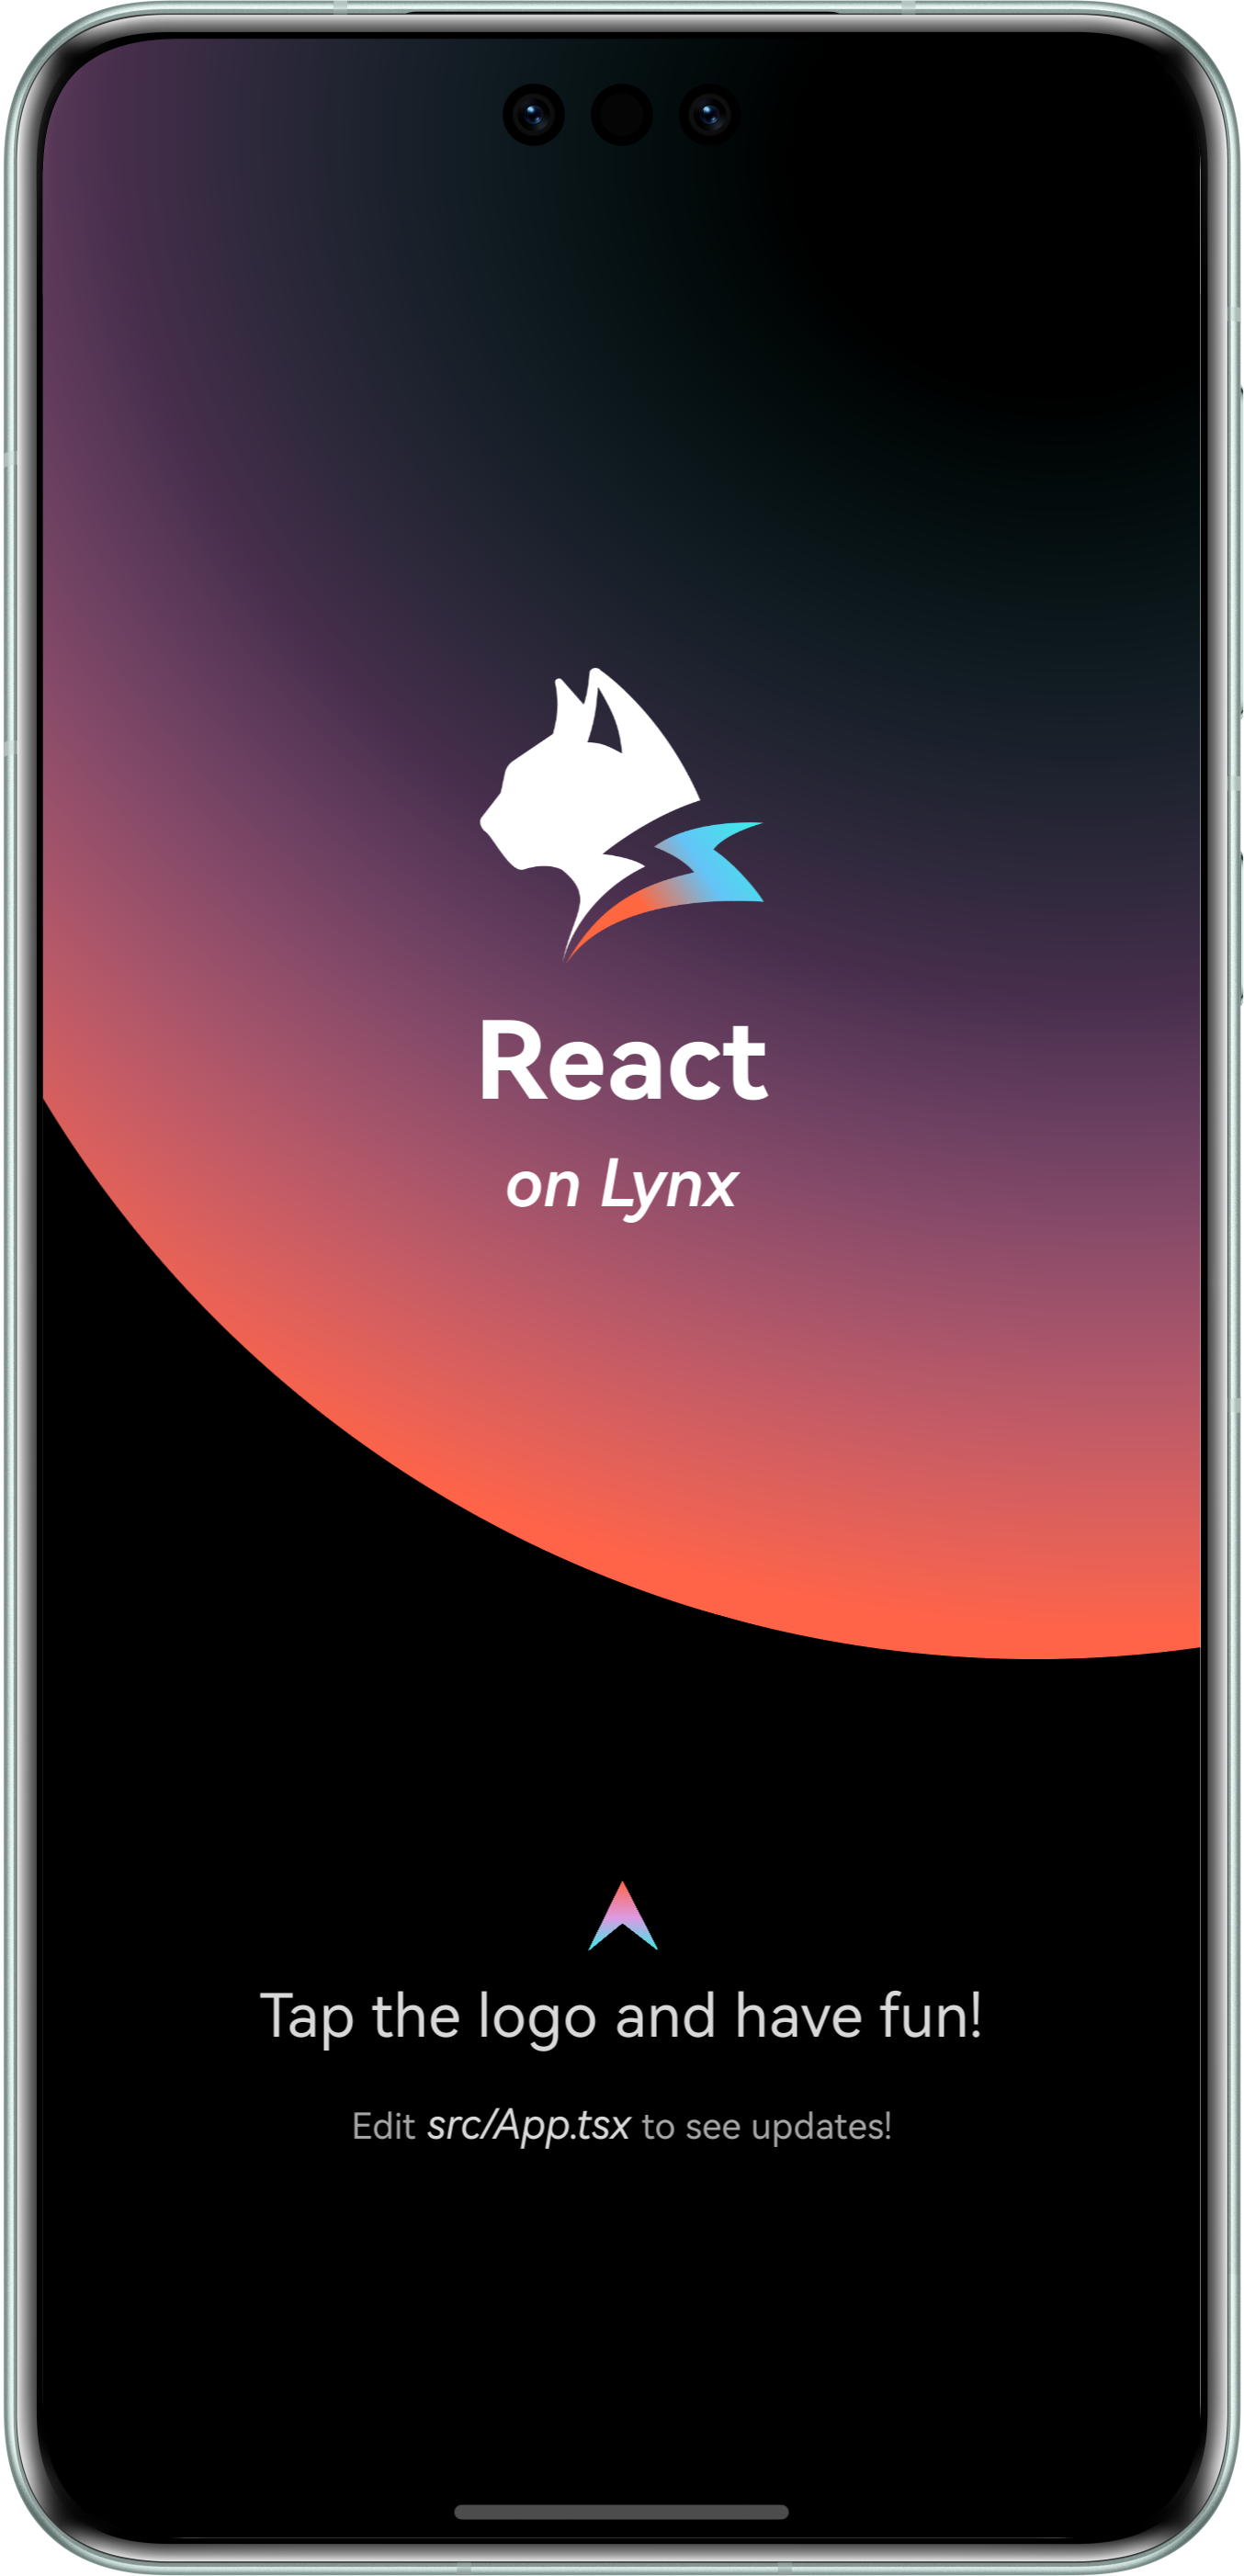
恭喜你,现在你现在已经完成了 Lynx Engine 集成的全部工作!
#4. 进入 Lynx 世界
#将 Lynx 集成到 Web 平台
Lynx for Web 在 Web 浏览器中实现了 Lynx 引擎。通过 Lynx for Web,你可以轻松地将 Lynx 应用集成到任何现有的 Web 项目中,无论该项目使用的是 React、Vue、Svelte 还是纯 HTML。
#1. 开发调试
我们需要你已经阅读并按照快速开始创建了一个 Lynx 项目。
#添加 web 配置
- 进入 Lynx 项目:
cd <lynx-project-name>lynx.config.ts增加 web 配置(environments.web):
import { defineConfig } from '@lynx-js/rspeedy';
import { pluginReactLynx } from '@lynx-js/react-rsbuild-plugin';

export default defineConfig({
  plugins: [pluginReactLynx()],
  environments: {
    web: {},
    lynx: {},
  },
});#启动开发服务器
执行:
npm run devyarn run devpnpm run devbun run devdeno run npm:dev即可在本地访问开发页面。
#构建与预览
你也可以使用 Web Explorer 来快速预览生产模式下的某个页面的 web bundle。
首先,执行构建:
npm run buildyarn run buildpnpm run buildbun run builddeno run npm:build你将会看到项目中多出了 dist/main.web.bundle 文件,它就是最终的 web 构建产物。
打开 Lynx Explorer Web 版,填写你的产物可访问的 URL,即可看到生产模式下的效果。
#2. 接入 web 项目
目前你已经有了一份 Lynx for Web 构建产物,接下来我们需要创建一个 web 工程去使用它,这里使用 Rsbuild。
#创建一个 web 项目
在上述的 Lynx 项目同级,创建一个新的工程,执行:
npm create rsbuild@latestyarn create rsbuildpnpm create rsbuild@latestbun create rsbuild@latestdeno init --npm rsbuild@latest跟随提示来创建一个 React 项目。
#配置工程
- 进入 Web 项目:
cd <web-project-name>- 安装依赖:
npm install @lynx-js/web-coreyarn add @lynx-js/web-corepnpm add @lynx-js/web-corebun add @lynx-js/web-coredeno add npm:@lynx-js/web-core- 在
src/App.tsx引入这些依赖:
import './App.css';
import '@lynx-js/web-core/client';
import type { LynxViewElement as LynxView } from '@lynx-js/web-core/client';

const App = () => {
  return (
    <lynx-view
      style={{ height: '100vh', width: '100vw' }}
      url="/main.web.bundle"
    ></lynx-view>
  );
};

export default App;- 更新
rsbuild.config.ts
server.publicDir 需要更换为你实际的 Lynx 项目路径。
import { defineConfig } from '@rsbuild/core';
import { pluginReact } from '@rsbuild/plugin-react';
import path from 'node:path';
import { fileURLToPath } from 'node:url';
const __filename = fileURLToPath(import.meta.url);
const __dirname = path.dirname(__filename);

export default defineConfig({
  plugins: [pluginReact()],
  server: {
    publicDir: [
      {
        name: path.join(
          __dirname,
          '../',
          // 这里请替换为你实际的 Lynx 项目名称
          'lynx-project',
          'dist',
        ),
      },
    ],
  },
});#启动工程
执行:
npm run devyarn run devpnpm run devbun run devdeno run npm:dev访问 http://localhost:3000 即能看到你的 Lynx 应用。
#3. API 参考
更多 API 细节请参阅 LynxView。
#将 Lynx 集成到 Windows 平台
- 本文假设你已熟悉原生 Windows 应用开发的基本概念。
- 你也可以参考官方的 LynxExplorer 项目。
#1. 依赖配置
#下载或构建 LynxSDK
- 可以从 GitHub Release 下载预编译的LynxSDK。
- 解压下载的LynxSDK到你项目的目录下,比如
thirdparty目录。
或者,你可以按照 为Windows构建 Lynx Explorer 指南从源代码构建。
#配置CMake
本文假设你已有一个基于CMake的Windows原生项目,并且希望集成Lynx能力。如果你使用的其它构建系统,你可以参考本文内容,并自行集成。
- 基于你的项目,设置CMake基本配置。
# Set the C++ standard to at least 17 if you are using the C++ wrapper apis of LynxSDK.
set(CMAKE_CXX_STANDARD 17)
set(CMAKE_CXX_STANDARD_REQUIRED ON)- 配置LynxSDK相关内容。
set(LYNX_LIB_PATH ${CMAKE_CURRENT_SOURCE_DIR}/thirdparty/lynx) # Or your location of LynxSDK
# Set include directory of LynxSDK.
include_directories(${LYNX_LIB_PATH}/include)
# Set library of LynxSDK that needs to be linked.
target_link_libraries(${PROJECT_NAME} ${LYNX_LIB_PATH}/lib/lynx.dll.lib)- 添加自定义命令,用于在构建应用之后,拷贝必须的数据和资源到应用包。
# 拷贝 lynx.dll 到输出目录
add_custom_command(TARGET ${PROJECT_NAME} POST_BUILD
COMMAND ${CMAKE_COMMAND} -E copy_if_different
${CMAKE_CURRENT_SOURCE_DIR}/thirdparty/lynx/lib/lynx.dll
$<TARGET_FILE_DIR:${PROJECT_NAME}>)
# 拷贝 data 到输出��目录
add_custom_command(TARGET ${PROJECT_NAME} POST_BUILD
COMMAND ${CMAKE_COMMAND} -E copy_directory
${CMAKE_CURRENT_SOURCE_DIR}/thirdparty/lynx/data
$<TARGET_FILE_DIR:${PROJECT_NAME}>/data)
# 拷贝 lynx_core.js 到输出目录
add_custom_command(TARGET ${PROJECT_NAME} POST_BUILD
COMMAND ${CMAKE_COMMAND} -E copy_if_different
${CMAKE_CURRENT_SOURCE_DIR}/thirdparty/lynx/lynx_core.js
$<TARGET_FILE_DIR:${PROJECT_NAME}>)
# 拷贝 lynx_core_dev.js 到输出目录
add_custom_command(TARGET ${PROJECT_NAME} POST_BUILD
COMMAND ${CMAKE_COMMAND} -E copy_if_different
${CMAKE_CURRENT_SOURCE_DIR}/thirdparty/lynx/lynx_core_dev.js
$<TARGET_FILE_DIR:${PROJECT_NAME}>)#2. 环境初始化 - 可选
#Lynx Service 初始化
- Lynx Service 旨在提供一些宿主应用特性强相关的能力,允许宿主应用在运行时注入自定义实现,推荐在LynxView创建之前完成 Lynx Service 的初始化。
- Lynx Service 需主动注入。
#include "lynx_env.h"
#include "lynx_http_service.h"
#include "lynx_view.h"
#include "lynx_generic_resource_fetcher.h"

// Implements the http service if needed.
class LynxHttpServiceImpl : public lynx::pub::LynxHttpService {
public:
LynxHttpServiceImpl() = default;
~LynxHttpServiceImpl() = default;

void Request(std::shared_ptr<lynx::pub::LynxHttpRequest> request,
std::shared_ptr<lynx::pub::LynxHttpResponse> response) override {
// TODO
}

};

int WINAPI WinMain(HINSTANCE hInstance, HINSTANCE hPrevInstance, LPSTR lpCmdLine, int nCmdShow) {
// Register http service for lynx.fetch.
lynx::pub::LynxServiceCenter::GetInstance().
RegisterService(std::make_shared<LynxHttpServiceImpl>());

// TODO: create window and construct LynxView.

return 0;
}
#LynxEnv 初始化
LynxEnv 提供了 Lynx Engine 的全局初始化接口, 请保证 LynxEnv 的初始化发生在 Lynx Engine 的任何接口调用之前。
#include <windows.h>

#include "lynx_env.h"
#include "lynx_http_service.h"
#include "lynx_view.h"
#include "lynx_generic_resource_fetcher.h"

int WINAPI WinMain(HINSTANCE hInstance, HINSTANCE hPrevInstance, LPSTR lpCmdLine, int nCmdShow) {
    // Register http service for lynx.fetch.
  lynx::pub::LynxServiceCenter::GetInstance().
    RegisterService(std::make_shared<LynxHttpServiceImpl>());

  // Initialize LynxEnv
  auto& lynx_env = lynx::pub::LynxEnv::GetInstance();
  // Enable devtool.
  lynx_env.SetDevtoolEnabled(true);
  lynx_env.SetDevtoolAppInfo("App", "LynxExplorer");
  lynx_env.SetDevtoolAppInfo("AppVersion", "1.0.0");
  // Register global native module if needed.
  lynx_env.RegisterNativeModule("ExplorerModule", ExplorerModuleCreator,
                            nullptr);

  // TODO: create window and construct LynxView.

  return 0;
}
#3. 渲染 LynxView
#创建资源加载器
Lynx Engine 自身并没有集成下载资源的能力,因此需要宿主应用来提供 LynxGenericResourceFetcher 的具体实现,并在构造 LynxView 时注入,Lynx 会采用注入的资源加载器来获取真实的 Bundle 内容。
你可以使用多种方式获取 Bundle 的资源内容,在这里我们选择通过本地文件加载 Bundle 的内容。
请先下载下面的Bundle文件到本地。
实现 Resource Fetcher (可选)
#include "lynx_env.h"
#include "lynx_http_service.h"
#include "lynx_view.h"
#include "lynx_generic_resource_fetcher.h"

class ExampleGenericResourceFetcher : public lynx::pub::LynxGenericResourceFetcher {
public:
void FetchResource(
std::shared_ptr<lynx::pub::LynxResourceRequest> request,
std::shared_ptr<lynx::pub::LynxResourceResponse> response) override {
// Implements fetching logic if you want to load Bundle from net.
}
};
#构造 LynxView
LynxView 是 Lynx Engine 提供的渲染基本单元,你可以快速的构造一个 LynxView,并通过设置一个窗口句柄作为父窗口容器。
#include <windows.h>

#include "lynx_env.h"
#include "lynx_http_service.h"
#include "lynx_view.h"
#include "lynx_generic_resource_fetcher.h"

int WINAPI WinMain(HINSTANCE hInstance, HINSTANCE hPrevInstance, LPSTR lpCmdLine, int nCmdShow) {
  // TODO: create window.

  // Construct LynxView.
  lynx::pub::LynxView::Builder builder;
  builder.SetScreenSize(800, 600, 1.0)
      .SetFrame(0, 0, 800, 600)
      .SetParent(hwnd);
  // Set Resource fetcher if needed.
  // builder.SetGenericResourceFetcher(std::make_shared<ExampleGenericResourceFetcher>());
  auto lynx_view = builder.Build();

  // Run message.
  MSG msg = {0};
  while (GetMessage(&msg, NULL, 0, 0)) {
    TranslateMessage(&msg);
    DispatchMessage(&msg);
  }
  return 0;
}
#渲染视图
当你完成以上步骤之后,已经完成了 LynxView 创建与资源读取的全部工作,调用 lynxView->LoadTemplate 方法,即可将对应的 Bundle 内容渲染到 LynxView 视图上。
#include <windows.h>

#include "lynx_env.h"
#include "lynx_http_service.h"
#include "lynx_view.h"
#include "lynx_generic_resource_fetcher.h"

int WINAPI WinMain(HINSTANCE hInstance, HINSTANCE hPrevInstance, LPSTR lpCmdLine, int nCmdShow) {
// TODO: create window.

// Construct LynxView.
lynx::pub::LynxView::Builder builder;
builder.SetScreenSize(800, 600, 1.0)
.SetFrame(0, 0, 800, 600)
.SetParent(hwnd);
// Set Resource fetcher if needed.
// builder.SetGenericResourceFetcher(std::make_shared<ExampleGenericResourceFetcher>());
auto lynx_view = builder.Build();

auto load_meta = std::make_shared<lynx::pub::LynxLoadMeta>();
// Set to your location.
load_meta->SetUrl("file://C:\\Users\\Admin\\Documents\\main.lynx.bundle");
lynx_view->LoadTemplate(load_meta);

// Run message.
MSG msg = {0};
while (GetMessage(&msg, NULL, 0, 0)) {
TranslateMessage(&msg);
DispatchMessage(&msg);
}
return 0;
}
然后你将在屏幕上看到如下内容:

恭喜你,现在你现在已经完成了 Lynx Engine 集成的全部工作!
#4. 进入 Lynx 世界
现在你已经将 Lynx 集成到你的应用中了。请参考开发和调试文档进一步在 Lynx 的世界里遨游吧!
#将 Lynx 集成到 macOS 平台
- 本文假设你已熟悉原生 macOS 应用开发的基本概念。
- 你也可以参考官方的 LynxExplorer 项目。
#1. 依赖配置
#下载或构建 LynxSDK
- 可以从 GitHub Release 下载预编译的LynxSDK。
- 解压下载的LynxSDK到你��项目的目录下,比如
thirdparty目录。
或者,你可以按照 为macOS构建 Lynx Explorer 指南从源代码构建。
#配置CMake
本文假设你已有一个基于CMake的macOS原生项目,并且希望集成Lynx能力。如果你使用的其它构建系统,你可以参考本文内容,并自行集成。
- 基于你的项目,设置CMake基本配置。
# Set the C++ standard to at least 17 if you are using the C++ wrapper apis of LynxSDK.
set(CMAKE_CXX_STANDARD 17)
set(CMAKE_CXX_STANDARD_REQUIRED ON)
set(CMAKE_OBJCXX_STANDARD 17)
set(CMAKE_OBJCXX_STANDARD_REQUIRED ON)- 配置LynxSDK相关内容。
set(LYNX_LIB_PATH ${CMAKE_CURRENT_SOURCE_DIR}/thirdparty/lynx) # Or your location of LynxSDK
# Set include directory of LynxSDK.
include_directories(${LYNX_LIB_PATH}/include)
# Set library of LynxSDK that needs to be linked.
target_link_libraries(${PROJECT_NAME} PRIVATE ${LYNX_LIB_PATH}/lib/libLynx.dylib)- 添加自定义命令,用于在构建应用之后,拷贝必须的数据和资源到应用包。
add_custom_command(TARGET ${PROJECT_NAME} POST_BUILD
    # 创建Frameworks目录
    COMMAND mkdir -p "$<TARGET_BUNDLE_CONTENT_DIR:${PROJECT_NAME}>/Frameworks"

    # 复制lynx动态库到Frameworks目录
    COMMAND cp "${LYNX_LIB_PATH}/lib/libLynx.dylib" "$<TARGET_BUNDLE_CONTENT_DIR:${PROJECT_NAME}>/Frameworks/"

    # 创建Resources目录
    COMMAND mkdir -p "$<TARGET_BUNDLE_CONTENT_DIR:${PROJECT_NAME}>/Resources"

    # 复制bundles目录到Resources
    COMMAND cp -R "${LYNX_LIB_PATH}/bundles/" "$<TARGET_BUNDLE_CONTENT_DIR:${PROJECT_NAME}>/Resources/"

    # 复制data目录到Resources
    COMMAND cp -R "${LYNX_LIB_PATH}/data/" "$<TARGET_BUNDLE_CONTENT_DIR:${PROJECT_NAME}>/Resources/"

    COMMENT "Copying Lynx library and resources to application bundle"
)

# 设置rpath,确保应用程序能够找到内部Frameworks目录中的动态库
target_link_options(${PROJECT_NAME} PRIVATE
    "-Wl,-rpath,@executable_path/../Frameworks"
)#2. 环境初始化 - 可选
#Lynx Service 初始化
- Lynx Service 提供了宿主特性相关能力,推荐在LynxView创建之前完成 Lynx Service 的初始化。
- Lynx Service 需主动注入。
#import "AppDelegate.h"
#import "ViewController.h"

#import "lynx_env.h"
#import "lynx_http_service.h"
#import "lynx_view.h"

// Implements the http service if needed.
class LynxHttpServiceImpl : public lynx::pub::LynxHttpService {
public:
LynxHttpServiceImpl() = default;
~LynxHttpServiceImpl() = default;
void Request(std::shared_ptr<lynx::pub::LynxHttpRequest> request, std::shared_ptr<lynx::pub::LynxHttpResponse> response) override {
// TODO
}
};

@interface AppDelegate ()
@end

@implementation AppDelegate {
}

- (void)applicationDidFinishLaunching:(NSNotification \*)aNotification {
  // Register http service for lynx.fetch.
  lynx::pub::LynxServiceCenter::GetInstance().RegisterService(std::make_shared<LynxHttpServiceImpl>());
  }
#LynxEnv 初始化
LynxEnv 提供了 Lynx Engine 的全局初始化接口, 请保证 LynxEnv 的初始化发生在 Lynx Engine 的任何接口调用之前。
#import "AppDelegate.h"
#import "ViewController.h"

#import "lynx_env.h"
#import "lynx_http_service.h"
#import "lynx_view.h"

@interface AppDelegate ()
@end

@implementation AppDelegate {
}

- (void)applicationDidFinishLaunching:(NSNotification *)aNotification {
    // Register http service for lynx.fetch.
  lynx::pub::LynxServiceCenter::GetInstance().RegisterService(std::make_shared<LynxHttpServiceImpl>());

  // Initialize LynxEnv
  auto& lynx_env = lynx::pub::LynxEnv::GetInstance();
  // Enable devtool.
  lynx_env.SetDevtoolEnabled(true);
  lynx_env.SetDevtoolAppInfo("App", "LynxExplorer");
  lynx_env.SetDevtoolAppInfo("AppVersion", "1.0.0");
  // Register global native module if needed.
  // lynx_env.RegisterNativeModule("ExplorerModule", ExplorerModuleCreator, nullptr);
}
#3. 渲染 LynxView
#创建资源加载器
Lynx Engine 自身并没有集成下载资源的能力,因此需要宿主应用来提供 LynxGenericResourceFetcher 的具体实现,并在构造 LynxView 时注入,Lynx 会采用注入的资源加载器来获取真实的 Bundle 内容。
你可以使用多种方式获取 Bundle 的资源内容,在这里我们选择通过网络加载 Bundle 的内容。
实现 Resource Fetcher
#import <Foundation/Foundation.h>
#import "lynx_generic_resource_fetcher.h"

class ExampleGenericResourceFetcher : public lynx::pub::LynxGenericResourceFetcher {
public:
void FetchResource(std::shared_ptr<lynx::pub::LynxResourceRequest> request, std::shared_ptr<lynx::pub::LynxResourceResponse> response) override;
};
#import <Foundation/Foundation.h>
#import "ExampleGenericResourceFetcher.h"

void ExampleGenericResourceFetcher::FetchResource(std::shared_ptr<lynx::pub::LynxResourceRequest> request, std::shared_ptr<lynx::pub::LynxResourceResponse> response) {
  const char *url_str = request->GetUrl();
  NSString *ns_string = [NSString stringWithUTF8String:url_str];

  NSURL *url = [NSURL URLWithString:ns_string];
  NSMutableURLRequest *nsRequest = [NSMutableURLRequest requestWithURL:url];
  NSURLSession *session = [NSURLSession sharedSession];
  NSURLSessionDataTask *dataTask =
    [session dataTaskWithRequest:nsRequest
              completionHandler:^(NSData *_Nullable data, NSURLResponse *_Nullable nsResponse,
                                  NSError *_Nullable error) {
                if (data && data.length > 0) {
                  response->SetCode(0);
                  response->SetData(
                      (uint8_t *)data.bytes, data.length,
                      [](uint8_t *body, size_t length, void *opaque) { CFRelease(opaque); },
                      (__bridge_retained void *)data);
                } else {
                  response->SetCode(-1);
                  response->SetErrorMessage("error");
                }
                response->Complete();
              }];

  [dataTask resume];
}
#构造 LynxView
LynxView 是 Lynx Engine 提供的渲染基本单元,你可以快速的构造一个 LynxView,并通过设置一个NSView作为父容器将其任意添加到原生macOS的视图树上。
#import "ViewController.h"
#import "ExampleGenericResourceFetcher.h"

#import "lynx_env.h"
#import "lynx_http_service.h"
#import "lynx_view.h"

@interface ViewController ()
@property(nonatomic) std::shared_ptr<lynx::pub::LynxView> lynxView;
@end

@implementation ViewController {
}

- (void)viewDidLoad {
  [super viewDidLoad];

  lynx::pub::LynxView::Builder builder;
  builder.SetScreenSize(self.view.frame.size.width, self.view.frame.size.height, 1.0)
  .SetFrame(0, 0, self.view.frame.size.width, self.view.frame.size.height)
  .SetParent((\_\_bridge NativeWindow)self.view)
  .SetGenericResourceFetcher(std::make_shared<ExampleGenericResourceFetcher>());
  self.lynxView = builder.Build();
  }

- (void)viewDidLayout {
  [super viewDidLayout];
  // It's necessary when resizing the Window.
  self.lynxView->UpdateScreenMetrics(self.view.frame.size.width, self.view.frame.size.height,
  1.0);
  self.lynxView->SetFrame(0, 0, self.view.frame.size.width, self.view.frame.size.height);
  }
#渲染视图
当你完成以上步骤之后,已经完成了 LynxView 创建与资源读取的全部工作,调用 lynxView->LoadTemplate 方法,即可将对应的 Bundle 内容渲染到 LynxView 视图上。
#import "ViewController.h"
#import "ExampleGenericResourceFetcher.h"

#import "lynx_env.h"
#import "lynx_http_service.h"
#import "lynx_view.h"

@interface ViewController ()
@property(nonatomic) std::shared_ptr<lynx::pub::LynxView> lynxView;
@end

@implementation ViewController {
}

- (void)viewDidLoad {
  [super viewDidLoad];

  lynx::pub::LynxView::Builder builder;
  builder.SetScreenSize(self.view.frame.size.width, self.view.frame.size.height, 1.0)
    .SetFrame(0, 0, self.view.frame.size.width, self.view.frame.size.height)
    .SetParent((__bridge NativeWindow)self.view)
    .SetGenericResourceFetcher(std::make_shared<ExampleGenericResourceFetcher>());
  self.lynxView = builder.Build();
  [self loadTemplate];
  }

- (void)loadTemplate {
  // Call `loadTemplate` where you want.
  auto meta_data = std::make_shared<lynx::pub::LynxLoadMeta>();
  meta_data->SetUrl("https://unpkg.com/@lynx-example/hello-world/dist/main.lynx.bundle");
  // Load template with meta_data
  self.lynxView->LoadTemplate(meta_data);
  }
然后你将在屏幕上看到如下内容:
恭喜你,现在你现在已经完成了 Lynx Engine 集成的全部工作!
#4. 进入 Lynx 世界
现在你已经将 Lynx 集成到你的应用中了。请参考开发和调试文档进一步在 Lynx 的世界里遨游吧!
在开发过程中,你可以使用 Lynx Explorer 快速预览和迭代 Lynx 页面,然后再集成到原生应用中。切换到用 Explorer 体验进行设置。