

Tutorial: Product Detail
In this tutorial, we'll implement a swiper component to teach you how to write high-performance interactive code. You'll learn:
- Direct Node Manipulation: You'll learn how to listen to events and update node styles
- Use Main Thread Script to Reduce Latency: You'll learn how to optimize interaction performance with main thread script
- Communication Between Main Thread and Background Thread: You'll learn how to enable communication between main thread and background thread functions
- Values Across Main Thread and Background Thread Script: You'll learn about data flow when using main thread and background thread script together
What Are We Building?
Let's have a look at what we're building! To try it out, download and install the Lynx Explorer App, then scan the QR code below.
The swiper responds to touch, so the web preview below demonstrates it for you: the swipes are simulated, and the circle marks where a finger would be. Touch or click the preview at any time and it hands control straight back to you.

Setup for the tutorial
Check out our detailed quick start doc that will guide you through creating a new Lynx project.
You may notice that the project is using TypeScript. Although Lynx and ReactLynx support both TypeScript and plain JavaScript, we recommend TypeScript for a better development experience, provided by static type checking and better editor IntelliSense.
You'll see lots of beautiful images throughout this guide. We've put together a package of sample images you can download here to use in your projects.
Direct Node Manipulation
Here's a product detail page example that includes a swiper and some product details. The <Swiper> accepts images and displays them in a row. Currently, it can't scroll - let's make it interactive.
The demonstration swipes this one too, and nothing moves — that is the point. Nothing here listens for the gesture yet.

To achieve this, we need to complete two tasks:
- Listen to touch events
- Update scroll position
Listen to Touch Events
Let's start by listening to touch events to calculate the current scroll progress.
When a touch starts, we record the initial touch coordinates. This allows us to calculate the distance moved (represented by delta) when the finger moves.
Next, we use currentOffsetRef to track the swiper component's offset, adding it to delta to get the final offset.
Updating Scroll Position
Once we get the offset, we can update the scroll position. Add an updateSwiperOffset function and call it when the finger moves.
Next, we use Node Manipulation to get the swiper-container node and use setNativeProps to update the transform property, thereby updating the scroll position.

Now the <Swiper> component can scroll with finger movements!
Why not use state to update progress?
You might think of using state to update the progress, like this:
However, in scenarios requiring frequent updates, this approach would cause constant component re-rendering, affecting performance. A better approach is to directly manipulate nodes, as shown in the example.
You can refer to Direct Node Manipulation to learn more.
Simplifying Code with Hooks
The <Swiper> component's code is getting complex. We can use hooks to encapsulate the logic into two parts, simplifying the component code and improving maintainability:
- Encapsulate the touch event listening code into
useOffset, centralizing all scroll-related logic in this hook - Encapsulate the scroll position update code into
useUpdateSwiperStyle, centralizing all<Swiper>component style update logic in this hook
Finally, the code is more concise.
Use Main Thread Script to Reduce Latency
You may have noticed that sometimes the scrolling doesn't feel smooth. This is because touch events occur in the main thread, while event listener code runs in the background thread, causing delayed touch event responses. This phenomenon is particularly noticeable on low-end devices.
We can use Main Thread Script to optimize this issue. After converting to main thread script, the scrolling becomes much smoother!

To achieve that, we need to migrate frequently triggered code to main thread script, including:
- Event listener code
- Node position update code
Let's modify both useOffset and useUpdateSwiperStyle.
useOffset
Add the main thread identifier to handleTouchStart and handleTouchMove to convert them into main thread functions.
Convert bindtouchstart and bindtouchmove to main-thread:bindtouchstart and main-thread:bindtouchmove to listen to events in main thread script.
useUpdateSwiperStyle
Convert useRef to useMainThreadRef.
Pass swiperContainerRef to <view> through the main-thread:ref attribute to access the node in the main thread.
The main thread node provides many capabilities, as shown in MainThread.Element. Here we call the setStyleProperties method to modify the transform property, updating the <Swiper> component's position.
With this, we've completed the main thread script conversion. Now high-frequency functions run in the main thread, making the interaction smoother.
Use Main Thread Script Sparingly
Only use main thread script when encountering response delay issues with frequently triggered events!
-
Introducing main thread script increases code complexity because main thread script and background thread script run in isolated environments and need "special bridges" to communicate.
-
Main thread script run high-frequency code in the main thread, increasing its burden. Overuse may cause main thread lag.
Communication Between Main Thread and Background Thread
Here's a progress indicator example that shows which page you're on when scrolling.
Currently, it only has styling but lacks progress update logic. We'll use this example to demonstrate how to enable communication between main thread and background thread:

Main Thread Calling Background Thread
The core of the progress indicator is the <Indicator> component, which accepts a current prop indicating the current page.
Now we just need to update current when scrolling.
We add an onIndexChange callback to useOffset to update current during scrolling.
And pass setCurrent as the onIndexUpdate callback to useOffset.
This way, when scrolling past a page, useOffset will call onIndexUpdate to update current, thereby updating the progress indicator.
But wait, why is there an error?!
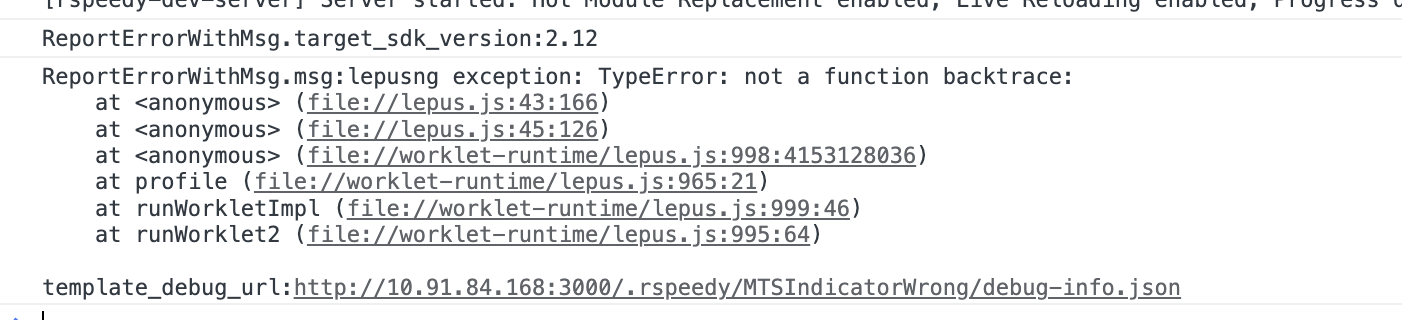
Main thread script and background thread script run in separate runtimes. Functions in one runtime cannot directly call functions in another runtime. They need "special bridges" to communicate:
- From background to main thread: Use
runOnMainThread - From main thread to background: Use
runOnBackground
onIndexUpdate is a background thread function. When called in a main thread function, we need to use runOnBackground

Now the progress indicator updates automatically as you scroll!
Background Thread Calling Main Thread
A useful progress indicator should also support clicking to jump to the corresponding page. Let's add click-to-jump functionality to the <Indicator> component.
Add an updateIndex method in useOffset that uses runOnMainThread to call updateOffset to update the component position.
Here's the complete code:

Great! Now the progress indicator supports click-to-jump functionality.
Values Across Main Thread and Background Thread Script
In the following example, we've added a snap effect animation to the <Swiper> component. Currently, the snap effect animation isn't ideal, we can add some props to customize it.

We'll use this example to demonstrate value passing between main thread and background thread script.
Main Thread Script Using Background Thread Script Values
First, we add a duration prop to the <Swiper> component to control the snap animation duration.
Let's see how it works internally. When touch ends, useOffset calls the animate function to update the component position with animation effects. animate is a main thread function that accepts initial and target values and updates the component position according to the animation curve over the duration time.
Here, both animate and handleTouchEnd are main thread functions, and they can access the background thread value duration.
Main thread script and background thread script run in separate runtimes and are isolated from each other.
However, to simplify main thread script development, Lynx automatically passes background thread values that main thread functions depend on to those functions, though this process has some limitations:
- The dependent background thread values must be serializable, so functions,
Promises, and other non-serializable values cannot be passed. - Value passing only occurs during component
render. If background thread values change afterrender, main thread functions won't be aware of these updates.
Background Thread Passing Main Thread Values
Next, we add a main-thread:easing prop to the <Swiper> component to allow users to customize the animation curve.
Inside the component, the main thread function easeInOut is passed to the background thread hook useOffset
And in useOffset, it's passed to the main thread function animate.
Main thread values, such as MainThreadRef and main thread functions, cannot be directly used by the background thread.
However, they can be passed by the background thread, such as being passed as props to components or as function parameters to other hooks or functions, and ultimately used in the main thread.
Add main-thread: Prefix for Props That Need Main Thread Functions
You may have noticed that when passing main thread functions or MainThreadRef as attributes, they need the main-thread: prefix, like main-thread:ref and main-thread:bindtouchstart.
By convention, when a prop expects a main thread function, it should have the main-thread: prefix, like main-thread:easing. We recommend following this convention for custom components too. This helps component users understand that the property requires a main thread function.
However, because variable names containing colons : are illegal in JavaScript, you need to rename these props when using them inside components.
Finally, we have a swiper with customizable animation curves.
Summary
In this tutorial, we started with a simple <Swiper> component, gradually optimized its performance, and finally implemented a swiper with customizable animation curves.
We learned about:
- Using direct node manipulation to optimize performance
- Leveraging main thread script to enhance interaction experience
- Implementing communication between main thread and background thread
- Understanding value passing between main thread and background thread script