#原生模块
在开发 Lynx 应用时,可能会遇到需要与 Lynx 未涵盖的原生平台 API 进行交互的场景。或者,你或许希望复用现有的原生平台代码到 Lynx 应用中。无论出于何种原因,都可以借助原生模块,实现 JavaScript 代码与原生代码的无缝连接,进而在 JavaScript 代码里调用原生平台的功能和 API。下面将详细介绍如何编写一个原生模块。
编写原生模块的基本步骤:
- 使用 TypeScript 声明类型化接口规范:通过 TypeScript 为原生模块定义清晰的接口规范,明确原生代码与 Lynx JavaScript 运行时之间传递的方法和数据类型。
- 依据接口规范编写 Lynx 应用代码:按照已声明的接口规范,在 Lynx 项目中编写具体的应用代码。
- 遵循接口规范编写原生平台代码并连接到 Lynx 运行时:根据接口规范完成原生平台代码的编写,然后将其与 Lynx 运行时环境进行连接。
下面,将通过构建一个原生模块示例,逐步展示这些步骤。
原生模块目前只能在 Background Thread Scripting 中使用。
#本地持久存储模块
本指南旨在展示如何编写一个本地持久存储模块,让 Lynx 应用能够利用 JavaScript 代码在本地持久地存储数据。
要在不同平台上实现本地持久存储功能,需要借助对应平台的原生 API 或 Lynx C/C++ API:
- Android: SharedPreferences
- iOS: NSUserDefaults
- HarmonyOS: Preferences
- Desktop (Node-API): Lynx C/C++ API 和 Weak Node-API C++ wrapper
#声明类型化的接口规范
原生模块的接口规范是连接原生代码和 Lynx JavaScript 运行时的桥梁,它定义了两者之间传递的方法和数据类型。
声明接口规范的步骤如下:
- 创建 Lynx 项目:参照创建一个 Lynx 项目指南,创建自己的 Lynx 项目。
- 新建类型声明文件:在 Lynx 项目中创建一个名为
src/typing.d.ts的新文件。 - 实现接口规范:在
typing.d.ts文件中实现原生模块的接口规范。
可以在类型对照表中查看规范中可用的类型以及对应的原生类型。
以下是本地持久存储模块的接口规范实现:
declare let NativeModules: {
  NativeLocalStorageModule: {
    setStorageItem(key: string, value: string): void;
    getStorageItem(key: string, callback: (value: string) => void): void;
    clearStorage(): void;
  };
};
NativeModules 是 Lynx 在 JavaScript 运行时中提供的全局内建对象,它是所有原生模块的访问入口,所有原生模块的声明需定义在其中。
#编写 Lynx 应用代码
接下来,在 Lynx 项目的 src/App.tsx 文件中编写应用代码。
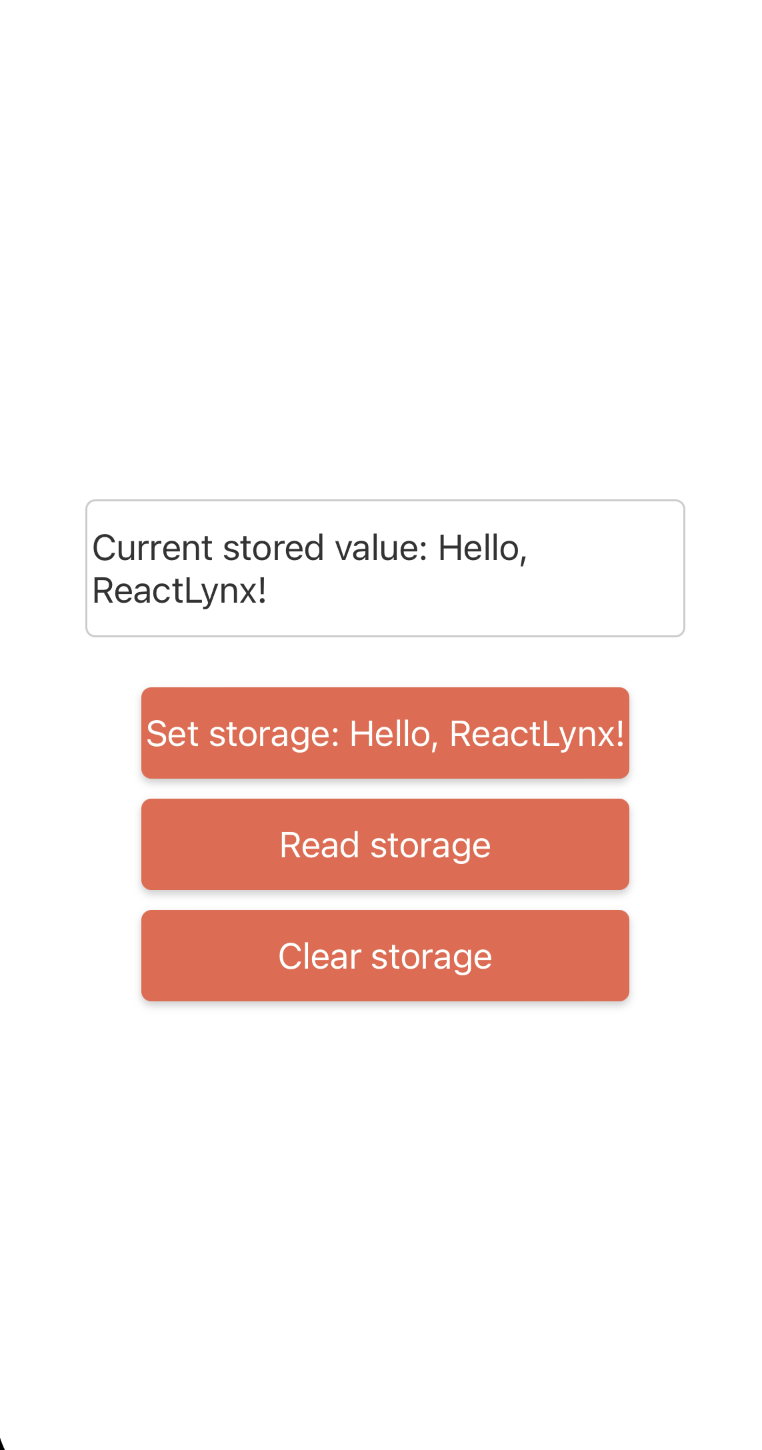
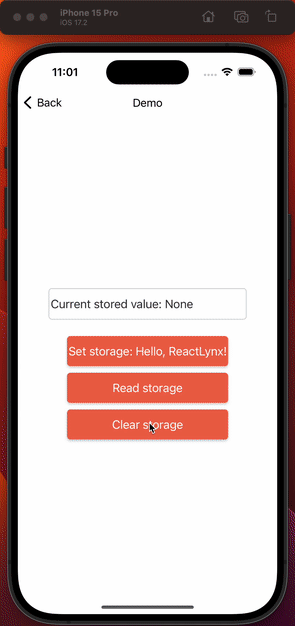
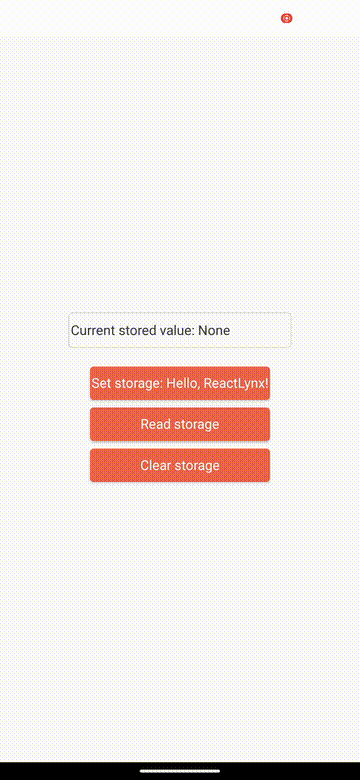
以下是本地持久存储模块的 App.tsx 示例,它包含一个用于显示本地存储内容的区域,以及三个用于读写和清除本地存储的按钮。
#编写原生平台代码
现在可以开始编写原生平台代码了。
#准备 Xcode 项目
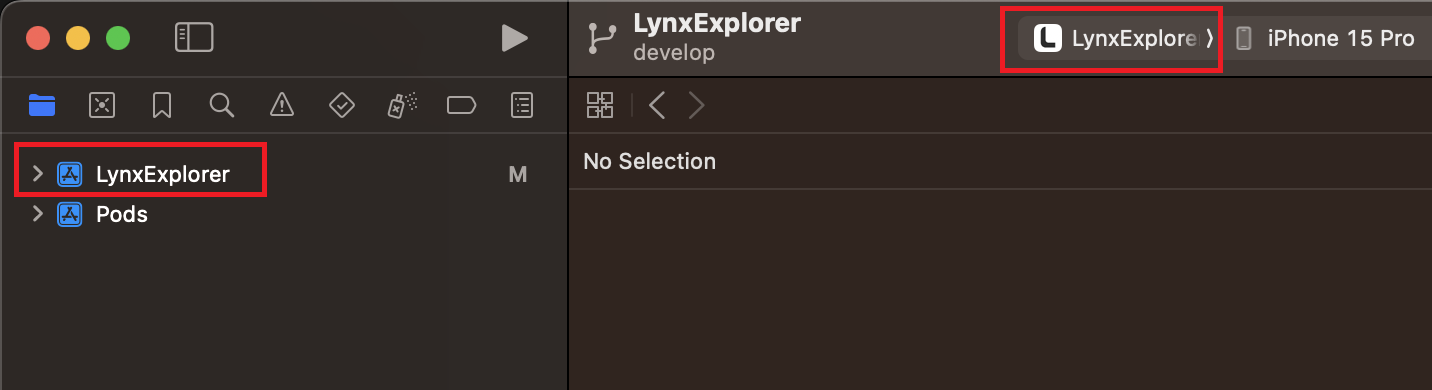
首先参照为 iOS 构建 Lynx Explorer 指南在本地创建 Lynx Explorer 项目,并用 Xcode 打开项目。
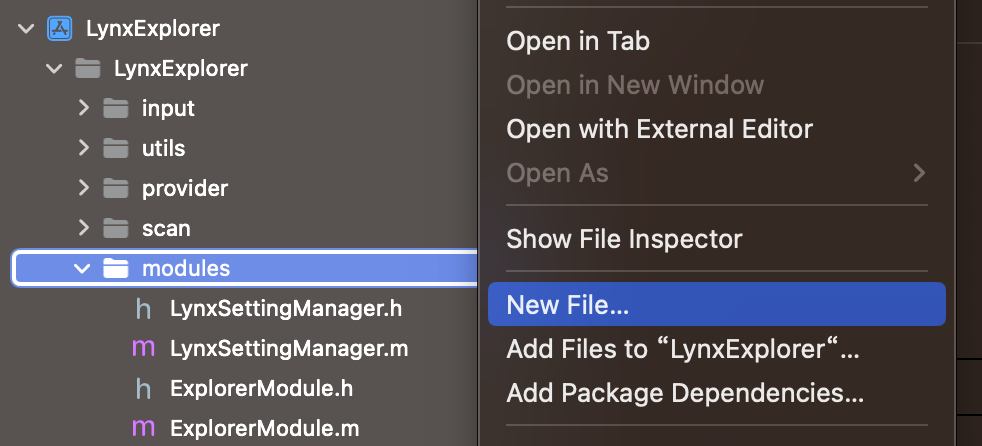
接着在 Lynx Explorer 项目的 modules 文件夹上右键点击,选择 New Fie... 创建原生模块代码文件。
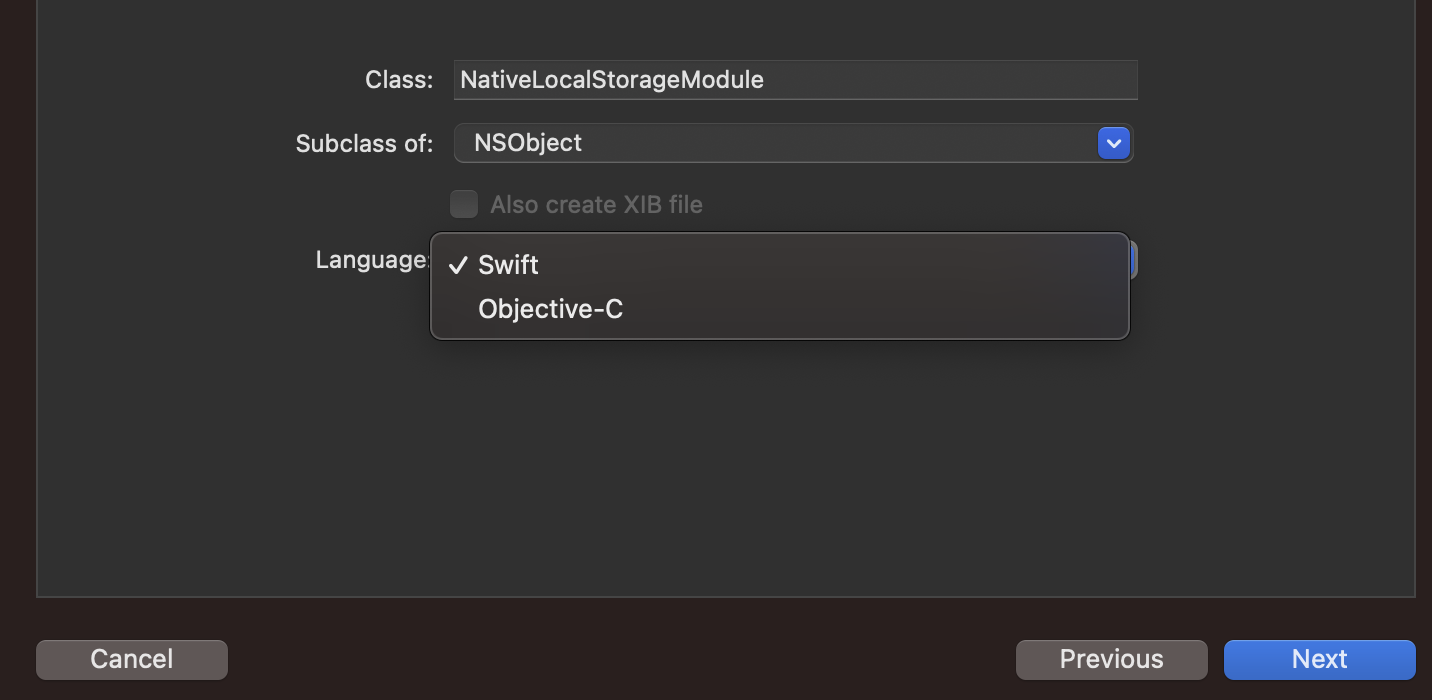
然后使用 Cocoa Touch Class 模板。

将类命名为 NativeLocalStorageModule,语言你可以选择创建 Objective-C,也可以选择 Swift。接着点击 Next,完成文件的创建。
#实现原生模块
原生模块需要实现额外的静态方法 name,返回原生模块的导出名字;实现额外的静态方法 methodLookup,将需要导出的方法名和对应的选择器进行映射。
#import <Foundation/Foundation.h>
#import <Lynx/LynxModule.h>

NS_ASSUME_NONNULL_BEGIN

@interface NativeLocalStorageModule : NSObject <LynxModule>

@end

NS_ASSUME_NONNULL_END#import "NativeLocalStorageModule.h"
@interface NativeLocalStorageModule()
@property (strong, nonatomic) NSUserDefaults *localStorage;
@end
@implementation NativeLocalStorageModule
static NSString *const NativeLocalStorageKey = @"MyLocalStorage";
- (instancetype)init {
if (self = [super init]) {
_localStorage = [[NSUserDefaults alloc] initWithSuiteName:NativeLocalStorageKey];
}
return self;
}
+ (NSString *)name {
return @"NativeLocalStorageModule";
}
+ (NSDictionary<NSString *, NSString *> *)methodLookup {
return @{
@"setStorageItem": NSStringFromSelector(@selector(setStorageItem:value:)),
@"getStorageItem": NSStringFromSelector(@selector(getStorageItem:callback:)),
@"clearStorage": NSStringFromSelector(@selector(clearStorage))
};
}
- (void)setStorageItem:(NSString *)key value:(NSString *)value {
[self.localStorage setObject:value forKey:key];
}
- (void)getStorageItem:(NSString *)key callback:(void(^)(NSString *value)) callback{
NSString *value = [self.localStorage stringForKey:key];
callback(value);
}
- (void)clearStorage {
NSDictionary *keys = [self.localStorage dictionaryRepresentation];
for (NSString *key in keys) {
[self.localStorage removeObjectForKey:key];
}
}
@end
Lynx Explorer 是使用 Objective-C 构建的项目,如果你希望在 Swift 文件中实现原生模块,请参考 Importing Objective-C into Swift 引入所需的 Lynx 头文件 LynxModule.h。
//
//  Use this file to import your target's public headers that you would like to expose to Swift.
//

#import <Lynx/LynxModule.h>
import Foundation

@objcMembers
public final class NativeLocalStorageModule: NSObject, LynxModule {

    public static var name: String {
        return "NativeLocalStorageModule"
    }

    public static var methodLookup: [String : String] {
        return [
            "setStorageItem": NSStringFromSelector(#selector(setStorageItem(_:value:))),
            "getStorageItem": NSStringFromSelector(#selector(getStorageItem(_:completion:))),
            "clearStorage": NSStringFromSelector(#selector(clearStorage))
        ]
    }

    private let localStorage: UserDefaults
    private static let storageKey = "MyLocalStorage"

    public init(param: Any) {
      guard let suite = UserDefaults(suiteName: NativeLocalStorageModule.storageKey) else {
          fatalError("Failed to initialize UserDefaults with suiteName: \(NativeLocalStorageModule.storageKey)")
      }
      localStorage = suite
      super.init()
    }

    public override init() {
        guard let suite = UserDefaults(suiteName: NativeLocalStorageModule.storageKey) else {
            fatalError("Failed to initialize UserDefaults with suiteName: \(NativeLocalStorageModule.storageKey)")
        }
        localStorage = suite
        super.init()
    }

    func setStorageItem(_ key: String, value: String) {
        localStorage.set(value, forKey: key)
    }

    objc func getStorageItem(_ key: String, completion:(NSString) -> Void) {
      if let value = localStorage.string(forKey: key) {
          completion(value as NSString)
      } else {
          completion("" as NSString)
      }
    }

    func clearStorage() {
        localStorage.dictionaryRepresentation().keys.forEach {
            localStorage.removeObject(forKey: $0)
        }
    }

}
接下来将原生模块注册到 Lynx 运行时环境中。
在 Lynx Explorer 工程的 explorer/darwin/ios/lynx_explorer/LynxExplorer/LynxInitProcessor.m 文件的 setupLynxEnv 方法中添加如下注册代码,将原生模块注册到 Lynx 运行时环境的全局配置中。
#import "NativeLocalStorageModule.h"

- (void)setupLynxEnv {
  // ...

  // register global JS module
  [globalConfig registerModule:NativeLocalStorageModule.class];

  // ...
}
Lynx Explorer 是使用 Objective-C 构建的项目,如果你希望在 Objective-C 文件中使用 swift 原生模块,请参考 Importing Swift into Objective-C 生成 LynxExplorer-Swift.h 头文件并引入。
#import "LynxExplorer-Swift.h"

- (void)setupLynxEnv {
    // ...

    // register global JS module
    [globalConfig registerModule:NativeLocalStorageModule.class];

    // ...
}#运行代码
准备好所有内容后,现在可以构建运行你的代码:
首先参照编译和运行 iOS Lynx Explorer 指南构建 Lynx Explorer,并安装到你的手机上。
接着参考安装依赖&启动开发服务器指南,在 Lynx 项目根目录下安装依赖并且启动开发服务器。
安装依赖:
npm installyarn installpnpm installbun installdeno install启动开发服务器:
npm run devyarn run devpnpm run devbun run devdeno run npm:dev你将会看到控制台中看到二维码和产物链接,使用 Lynx Explorer 扫描二维码或者填写产物链接即可打开你的 Lynx 页面。
首先参照为 Android 构建 Lynx Explorer 指南在本地创建 Lynx Explorer 项目。
接着在 Lynx Explorer 项目的 explorer/android/lynx_explorer/src/main/java/com/lynx/explorer/modules/ 路径下新建 NativeLocalStorageModule.java 或 NativeLocalStorageModule.kt 文件,并继承 LynxModule 实现 NativeLocalStorageModule 原生模块。
需要在原生模块的方法上添加 @LynxMethod 注解,实现方法的导出。
package com.lynx.explorer.modules;

import android.content.Context;
import android.content.SharedPreferences;

import com.lynx.jsbridge.LynxMethod;
import com.lynx.jsbridge.LynxModule;
import com.lynx.tasm.behavior.LynxContext;
import com.lynx.react.bridge.Callback

public class NativeLocalStorageModule extends LynxModule {
  private static final String PREF_NAME = "MyLocalStorage";
  public NativeLocalStorageModule(Context context) {
    super(context);
  }

  Context getContext() {
    LynxContext lynxContext = (LynxContext) mContext;
    return lynxContext.getContext();
  }

  @LynxMethod
  public void setStorageItem(String key, String value) {
    SharedPreferences sharedPreferences = getContext().getSharedPreferences(PREF_NAME, Context.MODE_PRIVATE);
    SharedPreferences.Editor editor = sharedPreferences.edit();
    editor.putString(key, value);
    editor.apply();
  }

  @LynxMethod
  public void getStorageItem(String key, Callback callback) {
    SharedPreferences sharedPreferences = getContext().getSharedPreferences(PREF_NAME, Context.MODE_PRIVATE);
    String value = sharedPreferences.getString(key, null);
    callback.invoke(value);
  }

  @LynxMethod
  public void clearStorage() {
    SharedPreferences sharedPreferences = getContext().getSharedPreferences(PREF_NAME, Context.MODE_PRIVATE);
    SharedPreferences.Editor editor = sharedPreferences.edit();
    editor.clear();
    editor.apply();
  }
}
package com.lynx.explorer.modules

import android.content.Context
import com.lynx.jsbridge.LynxMethod
import com.lynx.jsbridge.LynxModule
import com.lynx.tasm.behavior.LynxContext
import com.lynx.react.bridge.Callback

class NativeLocalStorageModule(context: Context) : LynxModule(context) {
  private val PREF_NAME = "MyLocalStorage"

  private fun getContext(): Context {
    val lynxContext = mContext as LynxContext
    return lynxContext.getContext()
  }

  @LynxMethod
  fun setStorageItem(key: String, value: String) {
    val sharedPreferences = getContext().getSharedPreferences(PREF_NAME, Context.MODE_PRIVATE)
    val editor = sharedPreferences.edit()
    editor.putString(key, value)
    editor.apply()
  }

  @LynxMethod
  fun getStorageItem(key: String, callback: Callback) {
    val sharedPreferences = getContext().getSharedPreferences(PREF_NAME, Context.MODE_PRIVATE)
    callback(sharedPreferences.getString(key, null))
  }

  @LynxMethod
  fun clearStorage() {
    val sharedPreferences = getContext().getSharedPreferences(PREF_NAME, Context.MODE_PRIVATE)
    val editor = sharedPreferences.edit()
    editor.clear()
    editor.apply()
  }
}
接下来将原生模块注册到 Lynx 运行时环境中。
在 Lynx Explorer 项目的 explorer/android/lynx_explorer/src/main/java/com/lynx/explorer/modules/LynxModuleAdapter.java 文件的 Init 方法中添加如下注册代码,将原生模块注册到 Lynx 运行时环境中。在这里需要指定导出的原生模块的名称,需要和上面的接口规范保持一致。
  public void Init(Context context) {
    // ......

    LynxEnv.inst().registerModule("NativeLocalStorageModule", NativeLocalStorageModule.class);

    // ......
  }
准备好所有内容后,现在可以构建运行你的代码。
首先参照编译和运行 Android Lynx Explorer 指南从源码构建 Lynx Explorer,并安装到你的手机上。
接着参考安装依赖&启动开发服务器指南,在 Lynx 项目根目录下安装依赖并且启动开发服务器。
安装依赖:
npm installyarn installpnpm installbun installdeno install启动开发服务器:
npm run devyarn run devpnpm run devbun run devdeno run npm:dev你将会在控制台中看到二维码,使用 Lynx Explorer 扫描二维码来打开页面。
首先参照为 HarmonyOS 构建 Lynx Explorer 指南在本地创建 Lynx Explorer 项目。
接着在 Lynx Explorer 项目下新建 NativeLocalStorageModule.ets 文件,并继承 @lynx/lynx 包中的 LynxModule 实现 NativeLocalStorageModule 原生模块。
你可以为 Module class 加上 @Sendable 注解,将其转换为 Sendable Module。只有 Sendable Module 的 Method 是同步的,其余的 Method 都是异步的。异步 Method 的返回值是 null。
import { LynxContext, LynxModule } from '@lynx/lynx';
import common from '@ohos.app.ability.common';
import { preferences } from '@kit.ArkData';

export class NativeLocalStorageModule extends LynxModule {
  private static readonly PREF_NAME: string = "NativeLocalStorageModule";
  private dataPreferences: preferences.Preferences | null = null;

  constructor(context: LynxContext, param?: Object) {
    super(context, param);
    this.initPreferencesSync();
  }

  private initPreferencesSync() {
    try {
      this.dataPreferences = preferences.getPreferencesSync(
        getContext(),
        { name: NativeLocalStorageModule.PREF_NAME }
      );
      console.info("Preferences initialization succeeded.");
    } catch (error) {
      console.error(`Failed to initialize preferences: ${error}`);
    }
  }

  public setStorageItem(key: string, value: string) {
    if (!this.dataPreferences) {
      console.error("Preferences instance is not initialized.");
      return;
    }

    try {
      this.dataPreferences.putSync(key, value);
      this.dataPreferences.flushSync();
      console.info(`Storage item set successfully. key=${key}`);
    } catch (err) {
      console.error(`Failed to set storage item. key=${key}, error=${err.message}`);
    }
  }

  public getStorageItem(key: string, callback: (value: string)=> void) {
    if (!this.dataPreferences) {
      console.error("Preferences instance is not initialized.");
      callback("");
      return;
    }

    try {
      const value = this.dataPreferences.getSync(key, "");
      callback(value as string);
      return;
    } catch (err) {
      console.error(`Failed to get storage item. key=${key}, error=${err.message}`);
      callback("");
      return;
    }
  }

  public clearStorage() {
    if (!this.dataPreferences) {
      console.error("Preferences instance is not initialized.");
      return;
    }

    try {
      this.dataPreferences.clearSync();
      this.dataPreferences.flushSync();
      console.info("Storage cleared successfully.");
    } catch (err) {
      console.error(`Failed to clear storage. error=${err.message}`);
    }
  }
}
接下来将原生模块注册到 Lynx 运行时环境中。
在 Lynx Explorer 项目的 explorer/harmony/lynx_explorer/src/main/ets/pages/Lynx.ets 文件的 aboutToAppear 方法中添加如下注册代码,将原生模块注册到 Lynx 运行时环境中。在这里需要指定原生模块的名称,需要和上面接口规范里的名称保持一致。
普通 Module 注册到 this.modules 中,Sendable Module 注册到 this.sendableModules。
import { NativeLocalStorageModule } from '../module/NativeLocalStorageModule';

@Entry
@Component
struct Lynx {
  aboutToAppear() {
    // `param` 是模块的可选构造参数
    this.modules.set('NativeLocalStorageModule', {
      moduleClass: NativeLocalStorageModule
    });
    // Sendable Module 请注册到 this.sendableModules
  }
}
准备好所有内容后,现在可以构建运行你的代码。
首先参照编译和运行 Lynx Explorer 指南从源码构建 Lynx Explorer,并安装到你的手机上。
接着参考安装依赖&启动开发服务器指南,在 Lynx 项目根目录下安装依赖并且启动开发服务器。
安装依赖:
npm installyarn installpnpm installbun installdeno install启动开发服务器:
npm run devyarn run devpnpm run devbun run devdeno run npm:dev你将会在控制台中看到二维码,使用 Lynx Explorer 扫描二维码来打开页面。
Desktop (Node-API) 平台使用 Lynx C/C++ API 把原生能力注册到 Lynx 运行时。原生模块的方法通过
Lynx 内部 JavaScript 运行时的 Weak Node-API 环境暴露给 NativeModules,注册入口使用
LYNX_REGISTER_NATIVE_MODULE。
npm 包 @lynx-js/weak-node-api
发布了 Weak Node-API 头文件,包括 napi.h、node_api.h、weak_napi_defines.h
和 weak_napi_undefs.h。在原生库工程中安装该包,并把它的 headers/ 目录接入构建系统,
即可使用 Napi:: C++ 包装类型。
下面的示例保持和前面的 TypeScript 声明一致,导出 NativeLocalStorageModule。
#include <lynx/registration.h>

#include "napi.h"

#ifdef USE_WEAK_SUFFIX_NAPI
#include "weak_napi_defines.h"
#endif

#include <string>
#include <unordered_map>

namespace {

std::unordered_map<std::string, std::string> g_storage;

void Check(napi_env env, napi_status status) {
  if (status != napi_ok) {
    napi_throw_error(env, nullptr, "N-API call failed");
  }
}

void SetFunction(
    napi_env env,
    napi_value object,
    const char* name,
    napi_callback callback) {
  napi_value function;
  Check(env, napi_create_function(
      env, name, NAPI_AUTO_LENGTH, callback, nullptr, &function));
  Check(env, napi_set_named_property(env, object, name, function));
}

Napi::Value SetStorageItem(const Napi::CallbackInfo& info) {
  Napi::Env env = info.Env();
  // Method:
  //   setStorageItem(
  //     key: string,
  //     value: string,
  //   ): void
  // types/napi-native-module.d.ts
  if (info.Length() < 2) {
    return env.Undefined();
  }
  Napi::String key = info[0].As<Napi::String>();
  Napi::String value = info[1].As<Napi::String>();
  g_storage[key.Utf8Value()] = value.Utf8Value();
  return env.Undefined();
}

Napi::Value GetStorageItem(const Napi::CallbackInfo& info) {
  Napi::Env env = info.Env();
  // Method:
  //   getStorageItem(
  //     key: string,
  //     callback: function,
  //   ): void
  // types/napi-native-module.d.ts
  if (info.Length() < 2) {
    return env.Undefined();
  }
  Napi::String key = info[0].As<Napi::String>();
  Napi::Function callback = info[1].As<Napi::Function>();
  auto iter = g_storage.find(key.Utf8Value());
  std::string value = iter == g_storage.end() ? "" : iter->second;
  callback.Call({Napi::String::New(env, value)});
  return env.Undefined();
}

Napi::Value ClearStorage(const Napi::CallbackInfo& info) {
  Napi::Env env = info.Env();
  // Method:
  //   clearStorage(): void
  // types/napi-native-module.d.ts
  g_storage.clear();
  return env.Undefined();
}

napi_value SetStorageItemCallback(napi_env env, napi_callback_info info) {
  return SetStorageItem(Napi::CallbackInfo(env, info));
}

napi_value GetStorageItemCallback(napi_env env, napi_callback_info info) {
  return GetStorageItem(Napi::CallbackInfo(env, info));
}

napi_value ClearStorageCallback(napi_env env, napi_callback_info info) {
  return ClearStorage(Napi::CallbackInfo(env, info));
}

void BindNativeLocalStorageModule(napi_env env, napi_value exports) {
  SetFunction(env, exports, "setStorageItem", SetStorageItemCallback);
  SetFunction(env, exports, "getStorageItem", GetStorageItemCallback);
  SetFunction(env, exports, "clearStorage", ClearStorageCallback);
}

static napi_value CreateNativeLocalStorageModule(
    ::lynx::registration::LynxNapiEnv env,
    ::lynx::registration::LynxNapiValue exports,
    const char* module_name,
    void* opaque) {
  (void)module_name;
  (void)opaque;
  BindNativeLocalStorageModule(env, exports);
  return exports;
}

}  // namespace

LYNX_REGISTER_NATIVE_MODULE(
    "NativeLocalStorageModule",
    CreateNativeLocalStorageModule,
    nullptr)

#ifdef USE_WEAK_SUFFIX_NAPI
#include "weak_napi_undefs.h"
#endif
准备好原生代码后,将它编译进宿主应用,或编译成可被宿主加载的桌面端原生库。可以参考
原生库与 Autolink 了解如何发布库、
并把它接入 Lynxtron 宿主。库加载完成后,静态注册会把 NativeLocalStorageModule
暴露到 NativeModules,Lynx 页面即可直接调用:
NativeModules.NativeLocalStorageModule.setStorageItem('language', 'JavaScript');
NativeModules.NativeLocalStorageModule.getStorageItem('language', (value) => {
  console.log(value); // 'JavaScript'
});
如果同一个桌面端原生库还需要暴露自定义元件,请参考 自定义元件的 Desktop 平台说明。
恭喜你,成功创建了原生模块!如果你想在你的应用中创建原生模块,首先需要参考接入现有应用指南集成 Lynx,然后参照上述步骤创建原生模块。
#类型对照表
| TypeScript | iOS(Objective-C) | Android(Java) | HarmonyOS(ets) | Weak Node-API |
|---|---|---|---|---|
null | nil | null | null | Napi::Value / env.Null() |
undefined | nil | null | undefined | Napi::Value / env.Undefined() |
boolean | BOOL (or NSNumber when used inside objects) | boolean (or Boolean when used inside objects) | boolean | Napi::Boolean |
number | double (or NSNumber when used inside objects) | double (or Number when used inside objects) | number | Napi::Number |
string | NSString | String | string | Napi::String |
BigInt | NSString | long (or Number when used inside objects) | BigInt | Napi::BigInt |
ArrayBuffer | NSData | byte[] | Buffer | Napi::ArrayBuffer |
object | NSDictionary | com.lynx.react.bridge.ReadableMap | object | Napi::Object |
array | NSArray | com.lynx.react.bridge.ReadableArray | array | Napi::Array |
function | block void (^)(id) | com.lynx.react.bridge.Callback | function | Napi::Function |
#原生模块权限验证(实验性)
在Lynx SDK 3.5之后,开发者可以通过LynxViewBuilder设置针对当前LynxView的原生模块验证器,从而对该LynxView中的所有的原生模块调用进行管控。目前仅支持Android与iOS,后续将逐步支持鸿蒙。
在使用LynxViewBuilder创建LynxView时,通过registerModuleAuthValidator接口注册原生模块验证器,验证器对当前LynxView中所有原生模块调用生效。
原生模块验证器接口
/**
* LynxMethod verification interface, used to verify whether the LynxMethod is allowed to be
* called
*/
public interface AuthValidator {
/**
 *
 * @param moduleName 被调用的原生模块名
 * @param methodName 被调用的原生模块方法名
 * @param methodParams 被调用的原生模块方法参数
 * @return
 * true: 验证通过,该原生模块调用将执行
 * false: 验证失败,原声模块调用不会执行,产生JS错误
 */
boolean verify(String moduleName, String methodName, JavaOnlyArray methodParams);
}
原生模块验证器注册方式
LynxViewBuilder builder = LynxView.builder()
    // 向LynxViewBuilder中注册验证器实例
    .registerModuleAuthValidator(new LynxModule.AuthValidator() {
        void validate(@NonNull String moduleName, @NonNull String moduleName, @NonNull ReadableMap params) {
           //验证逻辑
           return result;
        }
   }
LynxView view = builder.build(context);
在使用LynxViewBuilder创建LynxView时,通过registerMethodAuth接口注册原生模块验证器,验证器对当前LynxView中所有原生模块调用生效。
原生模块验证器接口
/**
*
* @param method:被调用的原生模块名方法名
* @param module:被调用的原生模块
* @param invoke_session:原生模块调用时间戳
* @param inv:该次调用的动态调用方法
* @return
* true: 验证通过,该原生模块调用将执行
* false: 验证失败,原声模块调用不会执行,产生JS错误
*/
typedef BOOL (^LynxMethodBlock)(NSString *method, NSString *module, NSString *invoke_session,
NSInvocation *inv);
原生模块验证器注册方式
// 向LynxViewBuilder中注册验证器实例
LynxViewBuilder *builder = GetLynxViewBuilder();
[builder.config registerMethodAuth:validtorBlock];