Native Modules

When developing Lynx applications, you may encounter scenarios where you need to interact with native platform APIs not covered by Lynx. Or, you might want to reuse existing native platform code in your Lynx application. Regardless of the reason, you can use Native Modules to seamlessly connect your JavaScript code with native code, allowing you to call native platform functions and APIs from your JavaScript code. The following will detail how to write a native module.

The basic steps for writing a native module are as follows:

  1. Use TypeScript to declare your typed interface specification.
  2. Use your interface specification to write your Lynx application code.
  3. Follow your interface specification to write your native platform code and connect your native code to the Lynx runtime environment.

Next, this guide will demonstrate these steps through an example of building a native module.

INFO

Currently, native modules can only be used in Background Thread Scripting.

Local Persistent Storage Module

This guide aims to show you how to write a local persistent storage module that enables your Lynx application to use JavaScript code to store data persistently locally.

To implement local persistent storage on mobile devices, you need to use the native APIs of Android, iOS and HarmonyOS:

Declare a Typed Interface Specification

The interface specification of a native module serves as a bridge between the native code and the Lynx JavaScript runtime, defining the methods and data types passed between them.

The steps to declare an interface specification are as follows:

  1. Create a Lynx project: Refer to the Create a Lynx Project guide to create your Lynx project.
  2. Create a new type declaration file: Create a new file named src/typing.d.ts in your Lynx project.
  3. Implement the interface specification: Implement the interface specification of the native module in the typing.d.ts file.
INFO

You can view the types available in the specification and their corresponding native types in the Type Mapping Table.

The following is the implementation of the interface specification for the local persistent storage module:

typing.d.ts
declare let NativeModules: {
  NativeLocalStorageModule: {
    setStorageItem(key: string, value: string): void;
    getStorageItem(key: string, callback: (value: string) => void): void;
    clearStorage(): void;
  };
};

NativeModules is a global built-in object provided by Lynx in the JavaScript runtime. It serves as the access point for all native modules, and all native module declarations must be defined within it.

Write Your Lynx Application Code

Next, write your application code in src/App.tsx within your Lynx project.

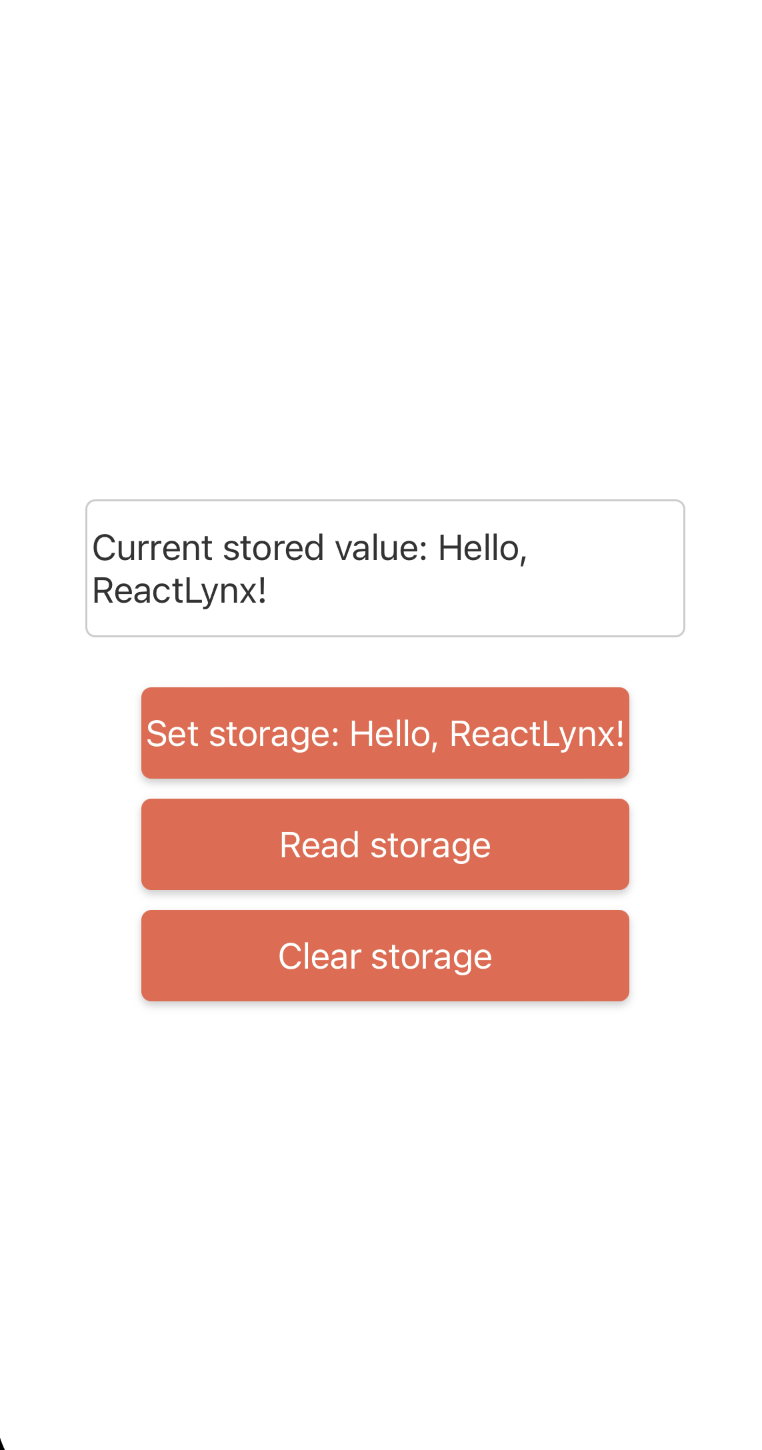
The following is the App.tsx for the local persistent storage module. It includes an area to display the content read from local storage and three buttons for reading, writing, and clearing local storage.

Write Your Native Platform Code

Now, you can start writing the native platform code.

Prepare Your Xcode Project

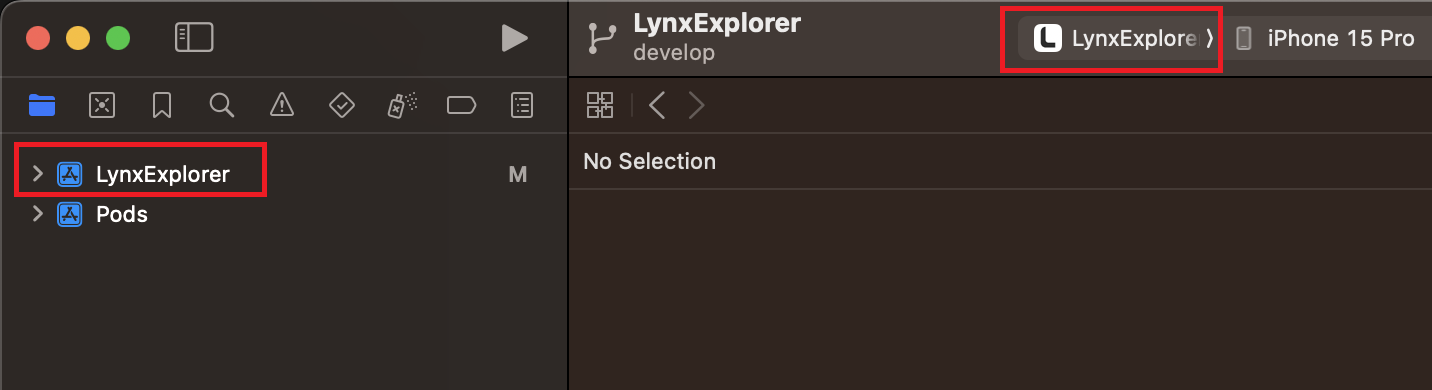
First, follow the Build Lynx Explorer for iOS guide to create a Lynx Explorer project locally and open it with Xcode.

demo

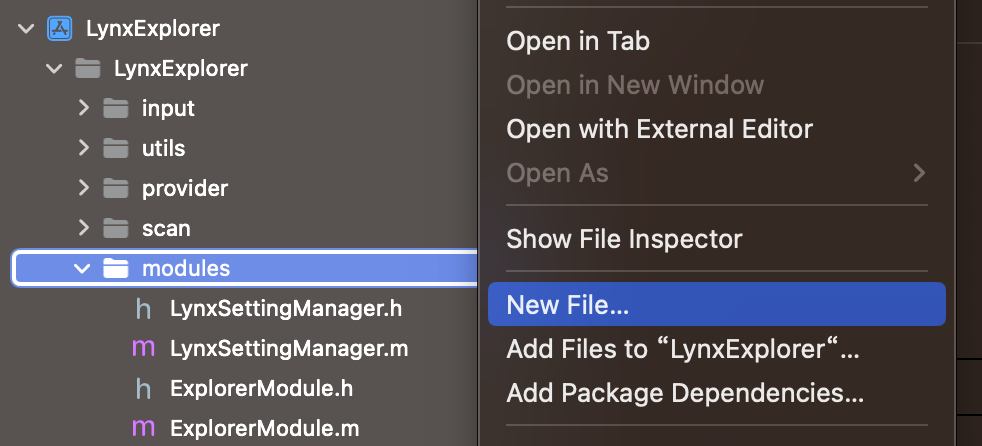
Next, right-click on the modules folder in the Lynx Explorer project and select New File... to create the header and source files for the native module.

demo

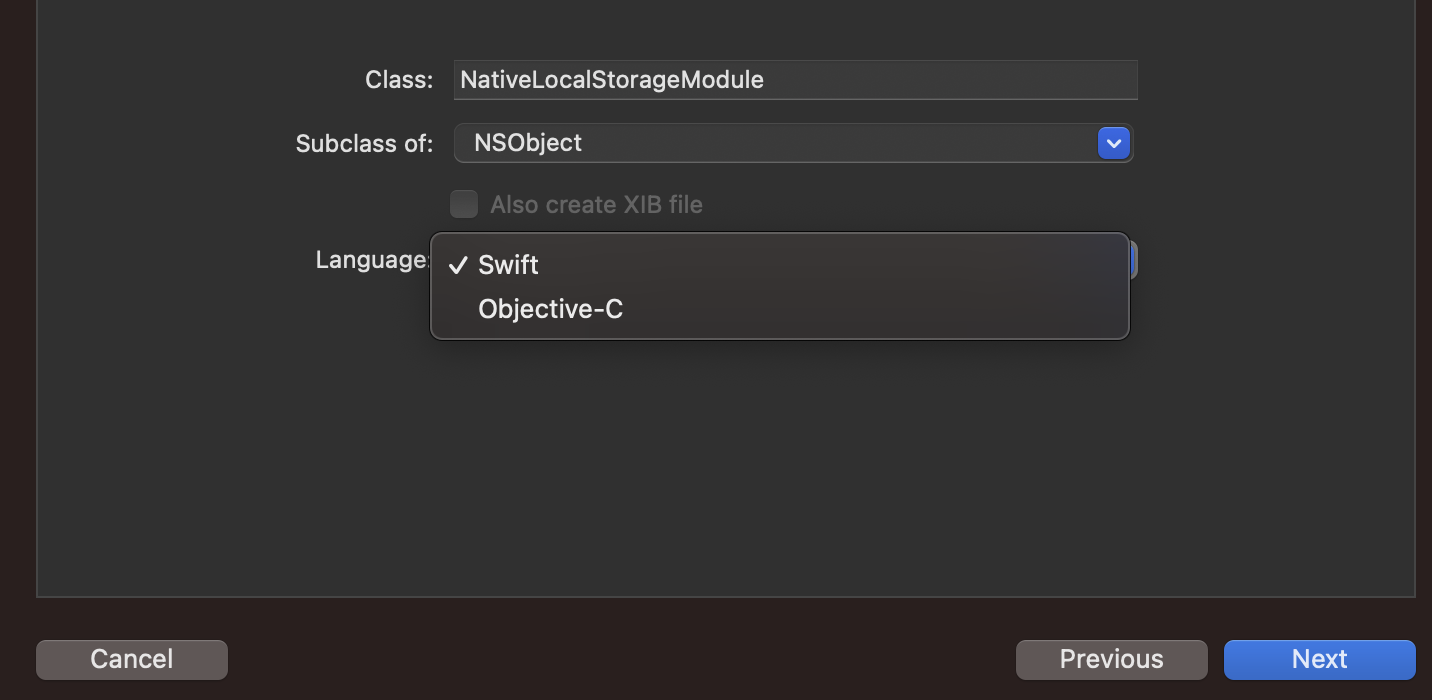
Then, use the Cocoa Touch Class template.

demo

Name the class NativeLocalStorageModule. You can choose to create it in either Objective-C or Swift. Then click Next to complete the file creation.

demo

Implement Your Native Module

INFO

You need to implement an additional static method name in the native module to return the exported name of your native module. Also, implement an additional static method methodLookup in the native module to map the names of the methods to be exported to their corresponding selectors.

Objective-C
Swift
explorer/darwin/ios/lynx_explorer/LynxExplorer/modules/NativeLocalStorageModule.h

#import <Foundation/Foundation.h>
#import <Lynx/LynxModule.h>

NS_ASSUME_NONNULL_BEGIN

@interface NativeLocalStorageModule : NSObject <LynxModule>

@end

NS_ASSUME_NONNULL_END
explorer/darwin/ios/lynx_explorer/LynxExplorer/modules/NativeLocalStorageModule.m
#import "NativeLocalStorageModule.h"

@interface NativeLocalStorageModule()
@property (strong, nonatomic) NSUserDefaults *localStorage;
@end

@implementation NativeLocalStorageModule

static NSString *const NativeLocalStorageKey = @"MyLocalStorage";

- (instancetype)init {
    if (self = [super init]) {
        _localStorage = [[NSUserDefaults alloc] initWithSuiteName:NativeLocalStorageKey];
    }
    return self;
}

+ (NSString *)name {
    return @"NativeLocalStorageModule";
}

+ (NSDictionary<NSString *, NSString *> *)methodLookup {
    return @{
        @"setStorageItem": NSStringFromSelector(@selector(setStorageItem:value:)),
        @"getStorageItem": NSStringFromSelector(@selector(getStorageItem:callback:)),
        @"clearStorage": NSStringFromSelector(@selector(clearStorage))
    };
}

- (void)setStorageItem:(NSString *)key value:(NSString *)value {
    [self.localStorage setObject:value forKey:key];
}

- (void)getStorageItem:(NSString *)key callback:(void(^)(NSString *value)) callback{
    NSString *value = [self.localStorage stringForKey:key];
    callback(value);
}

- (void)clearStorage {
    NSDictionary *keys = [self.localStorage dictionaryRepresentation];
    for (NSString *key in keys) {
        [self.localStorage removeObjectForKey:key];
    }
}

@end

Next, you need to register your native module into the Lynx runtime environment.

Add the following registration code to the setupLynxEnv method in the explorer/darwin/ios/lynx_explorer/LynxExplorer/LynxInitProcessor.m file of the Lynx Explorer project to register your native module with the global configuration of the Lynx runtime environment.

Objective-C
Swift
explorer/darwin/ios/lynx_explorer/LynxExplorer/LynxInitProcessor.m

#import "NativeLocalStorageModule.h"

- (void)setupLynxEnv {
  // ...

  // register global JS module
  [globalConfig registerModule:NativeLocalStorageModule.class];

  // ...
}


NS_ASSUME_NONNULL_END

Run Your Code

Once you've prepared everything, you can now build and run your code.

First, follow the Build and Run iOS Lynx Explorer guide to build Lynx Explorer and install it on your phone.

Next, refer to the Install Dependencies & Start the Development Server guide to install dependencies and start the development server in the root directory of your Lynx project.

Install dependencies:

npm
yarn
pnpm
bun
npm install

Start the development server:

npm
yarn
pnpm
bun
npm run dev

You'll see a QR code and an artifact link in the console. Use Lynx Explorer to scan the QR code or enter the artifact link to open your Lynx page.

demo

First, follow the Build Lynx Explorer for Android guide to create a Lynx Explorer project locally.

Next, create a new NativeLocalStorageModule.java or NativeLocalStorageModule.kt file in the explorer/android/lynx_explorer/src/main/java/com/lynx/explorer/modules/ path of the Lynx Explorer project. Then, inherit from LynxModule to implement the NativeLocalStorageModule native module.

INFO

You need to add the @LynxMethod annotation to the methods that need to be exported in the native module.

Java
Kotlin
explorer/android/lynx_explorer/src/main/java/com/lynx/explorer/modules/NativeLocalStorageModule.java
package com.lynx.explorer.modules;

import android.content.Context;
import android.content.SharedPreferences;

import com.lynx.jsbridge.LynxMethod;
import com.lynx.jsbridge.LynxModule;
import com.lynx.tasm.behavior.LynxContext;
import com.lynx.react.bridge.Callback

public class NativeLocalStorageModule extends LynxModule {
  private static final String PREF_NAME = "MyLocalStorage";
  public NativeLocalStorageModule(Context context) {
    super(context);
  }

  Context getContext() {
    LynxContext lynxContext = (LynxContext) mContext;
    return lynxContext.getContext();
  }

  @LynxMethod
  public void setStorageItem(String key, String value) {
    SharedPreferences sharedPreferences = getContext().getSharedPreferences(PREF_NAME, Context.MODE_PRIVATE);
    SharedPreferences.Editor editor = sharedPreferences.edit();
    editor.putString(key, value);
    editor.apply();
  }

  @LynxMethod
  public void getStorageItem(String key, Callback callback) {
    SharedPreferences sharedPreferences = getContext().getSharedPreferences(PREF_NAME, Context.MODE_PRIVATE);
    String value = sharedPreferences.getString(key, null);
    callback.invoke(value);
  }

  @LynxMethod
  public void clearStorage() {
    SharedPreferences sharedPreferences = getContext().getSharedPreferences(PREF_NAME, Context.MODE_PRIVATE);
    SharedPreferences.Editor editor = sharedPreferences.edit();
    editor.clear();
    editor.apply();
  }
}

Next, you need to register your native module with the Lynx runtime environment.

Add the following registration code to the Init method in the explorer/android/lynx_explorer/src/main/java/com/lynx/explorer/modules/LynxModuleAdapter.java file of the Lynx Explorer project to register your native module with the Lynx runtime environment. Here, you need to specify the name of the native module you are exporting, which must be consistent with your interface specification.

explorer/android/lynx_explorer/src/main/java/com/lynx/explorer/modules/LynxModuleAdapter.java

  public void Init(Context context) {
    // ......

    LynxEnv.inst().registerModule("NativeLocalStorageModule", NativeLocalStorageModule.class);

    // ......
  }

After preparing everything, you can now build and run your code.

First, follow the Compile and Run Android Lynx Explorer guide to build Lynx Explorer from source code and install it on your phone.

Then, refer to the Install Dependencies & Start the Development Server guide to install dependencies and start the development server in the root directory of your Lynx project.

Install dependencies:

npm
yarn
pnpm
bun
npm install

Start the development server:

npm
yarn
pnpm
bun
npm run dev

You will see a QR code in the console. Use Lynx Explorer to scan the QR code to open the page.

demo

First, follow the Build Lynx Explorer for HarmonyOS guide to create a Lynx Explorer project locally.

Next, create a new NativeLocalStorageModule.ets file in the Lynx Explorer project and inherit from LynxModule in the @lynx/lynx package to implement the NativeLocalStorageModule native module.

INFO

You can add the @Sendable annotation to the Module class to convert it into a Sendable Module. Only the methods of a Sendable Module are synchronous; all other methods are asynchronous. The return value of an asynchronous method is null.

NativeLocalStorageModule.ets
import { LynxModule } from '@lynx/lynx';
import Constants from '../common/constants';
import { featureAbility } from '@kit.AbilityKit';
import { preferences } from '@kit.ArkData';

export class NativeLocalStorageModule {
  private static readonly PREF_NAME: string = "MyLocalStorage";
  private context: any;
  private dataPreferences: preferences.Preferences | null = null;

  constructor(context: any) {
    this.context = context;
    this.initPreferencesSync();
  }

  private initPreferencesSync() {
    try {
      this.dataPreferences = preferences.getPreferencesSync(
        this.getContext(), 
        { name: NativeLocalStorageModule.PREF_NAME }
      );
      console.info("Preferences initialization succeeded.");
    } catch (error) {
      console.error(`Failed to initialize preferences: ${error}`);
    }
  }

  private getContext(): any {
    return featureAbility.getContext();
  }

  public setStorageItem(key: string, value: string) {
    if (!this.dataPreferences) {
      console.error("Preferences instance is not initialized.");
      return;
    }

    try {
      this.dataPreferences.putSync(key, value);
      this.dataPreferences.flushSync();
      console.info(`Storage item set successfully. key=${key}`);
    } catch (err: any) {
      console.error(`Failed to set storage item. key=${key}, error=${err.message}`);
    }
  }

  public getStorageItem(key: string, callback: (value: string)=> void) {
    if (!this.dataPreferences) {
      console.error("Preferences instance is not initialized.");
      callback("");
      return;
    }

    try {
      const value = this.dataPreferences.getSync(key, "");
      callback(value as string);
      return;
    } catch (err) {
      console.error(`Failed to get storage item. key=${key}, error=${err.message}`);
      callback("");
      return;
    }
  }

  public clearStorage() {
    if (!this.dataPreferences) {
      console.error("Preferences instance is not initialized.");
      return;
    }

    try {
      this.dataPreferences.clearSync();
      this.dataPreferences.flushSync();
      console.info("Storage cleared successfully.");
    } catch (err: any) {
      console.error(`Failed to clear storage. error=${err.message}`);
    }
  }
}

Next, register the native module with the Lynx runtime environment.

In the aboutToAppear method of the explorer/harmony/lynx_explorer/src/main/ets/pages/Lynx.ets file in your Lynx Explorer project, add the following registration code to register the native module with the Lynx runtime environment. Here, you need to specify the name of the native module, which must be consistent with the name in the interface specification above.

INFO

Register a regular Module in this.modules , and a Sendable Module in this.sendableModules .

src/main/ets/pages/Lynx.ets
import { NativeLocalStorageModule } from '../module/NativeLocalStorageModule';

@Entry
@Component
struct Lynx {
  aboutToAppear() {
    // `param` is an optional constructor parameter for the module
    this.modules.set('NativeLocalStorageModule', {
      moduleClass: NativeLocalStorageModule,
      param: {}
    });
    // Register Sendable Modules to this.sendableModules
  }
}

Once you've prepared everything, you can now build and run your code.

First, follow the Build and Run Harmony Lynx Explorer guide to build Lynx Explorer and install it on your phone.

Next, refer to the Install Dependencies & Start the Development Server guide to install dependencies and start the development server in the root directory of your Lynx project.

Install dependencies:

npm
yarn
pnpm
bun
npm install

Start the development server:

npm
yarn
pnpm
bun
npm run dev

You'll see a QR code and an artifact link in the console. Use Lynx Explorer to scan the QR code or enter the artifact link to open your Lynx page.

demo

Congratulations! You have successfully created a native module in Lynx Explorer! If you want to create a native module in your application, you first need to integrate Lynx by referring to the Integrate with Existing Apps guide, and then follow the steps above to create the native module.

Type Mapping Table

TypeScriptiOS(Objective-C)Android(Java)HarmonyOS(ets)
nullnilnullnull
undefinednilnullundefined
booleanBOOL (or NSNumber when used inside objects)boolean (or Boolean when used inside objects)boolean
numberdouble (or NSNumber when used inside objects)double (or Number when used inside objects)number
stringNSStringStringstring
BigIntNSStringlong (or Number when used inside objects)BigInt
ArrayBufferNSDatabyte[]Buffer
objectNSDictionarycom.lynx.react.bridge.ReadableMapobject
arrayNSArraycom.lynx.react.bridge.ReadableArrayarray
functionblock void (^)(id)com.lynx.react.bridge.Callbackfunction
Except as otherwise noted, this work is licensed under a Creative Commons Attribution 4.0 International License, and code samples are licensed under the Apache License 2.0.